
SUPPORT


FAQ
How to log in HUMAX router’s setting interface?
The router’s setting interface allows you to setup basic and advanced settings for better network experience. If you want to login to HUMAX router’s setting interface to configure some settings, please follow the steps below.
Step 1
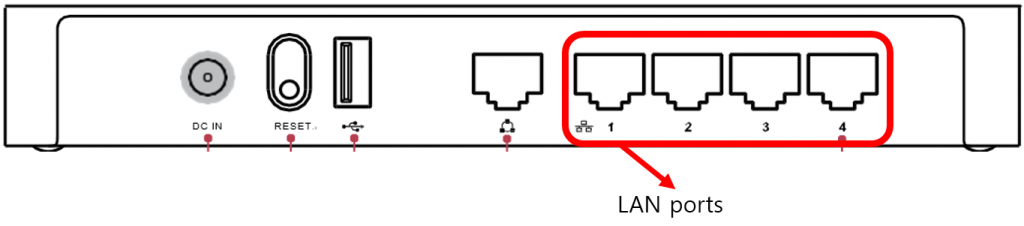
Use an Ethernet cable to connect your computer to one of the LAN ports (Orange port) at the back panel of the router.
(It is suggested to use a wired connection than wireless if you are going to change the router’s wireless settings or upgrade the firmware version of the router.)
Step 2
Open the web browser and in the address bar type enter default access IP and then press Enter.
(The default access IP of HUMAX routers is //192.168.1.1)

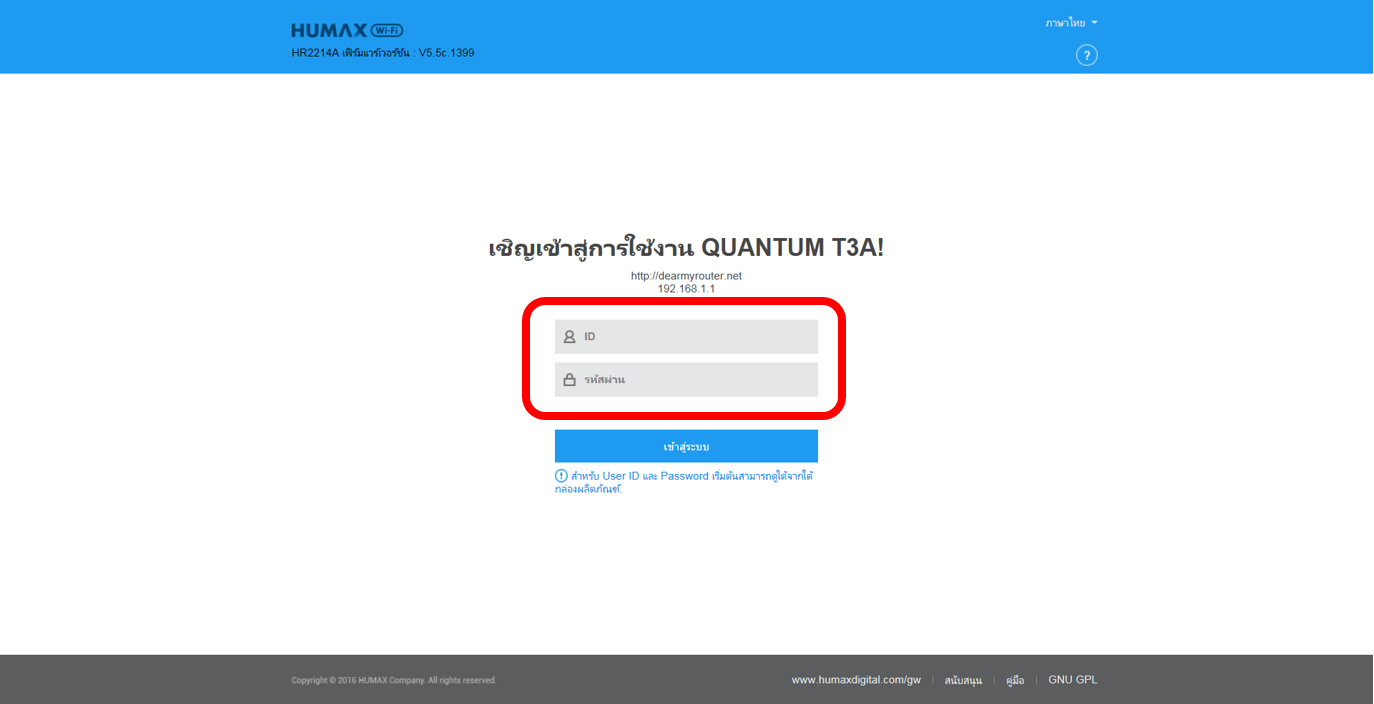
Step 3
Type the username and password in the login page. Refer to the default login username and password at the bottom of your product.
Step 4
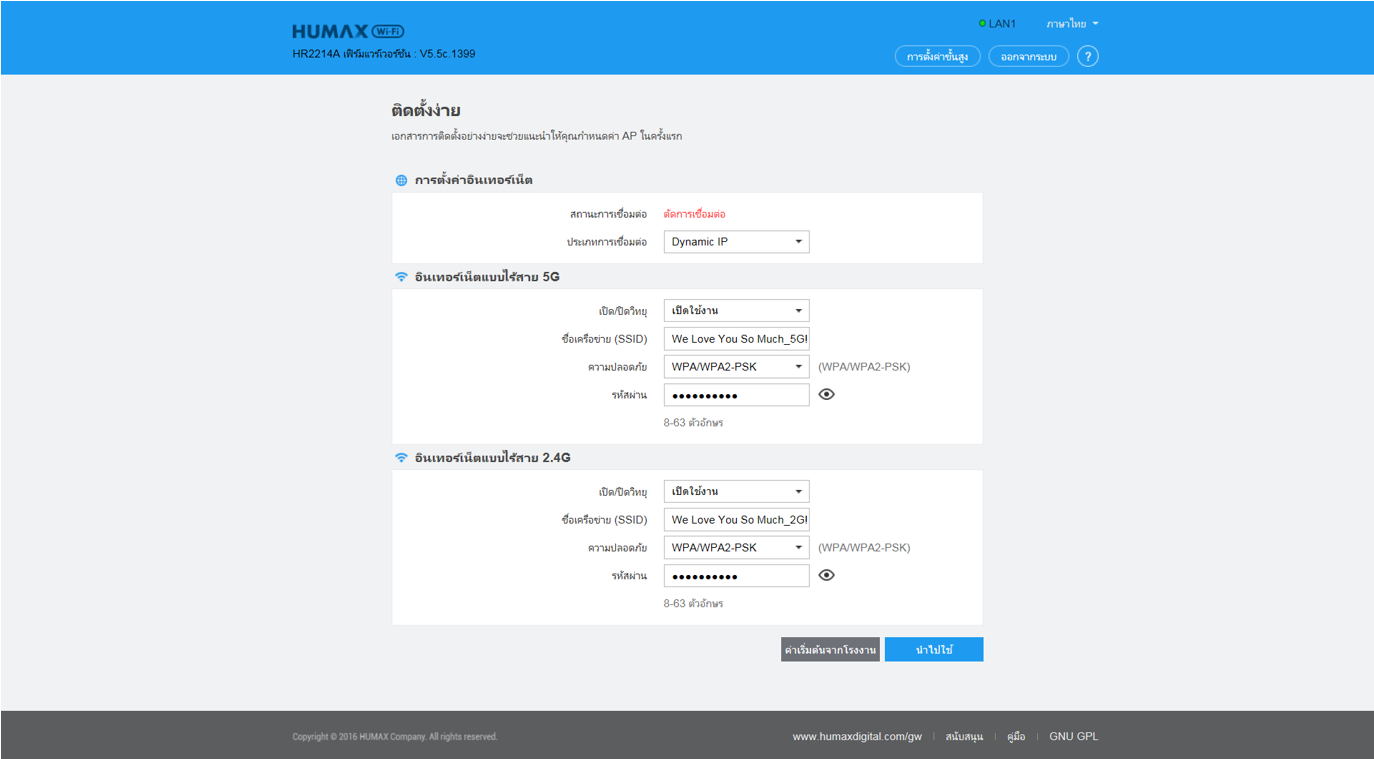
Please check the Easy Setup page open.
Note:
If you forgot ID and Password, please try again after factory default setting.
Step 1
Use an Ethernet cable to connect your computer to one of the LAN ports (Orange port) at the back panel of the router.
(It is suggested to use a wired connection than wireless if you are going to change the router’s wireless settings or upgrade the firmware version of the router.)
Step 2
Open the web browser and in the address bar type enter default access IP and then press Enter.
(The default access IP of HUMAX routers is //192.168.1.1)
Step 3
Type the username and password in the login page. Refer to the default login username and password at the bottom of your product.

Step 4
Please check the Easy Setup page open.

Note:
If you forgot ID and Password, please try again after factory default setting.
How to change Login User Name and Password?
If you want to modify the router’s user name and password for logging in the web-configuration interface, please follow the steps below.
Step 1
Log into the router’s web interface.
Step 2
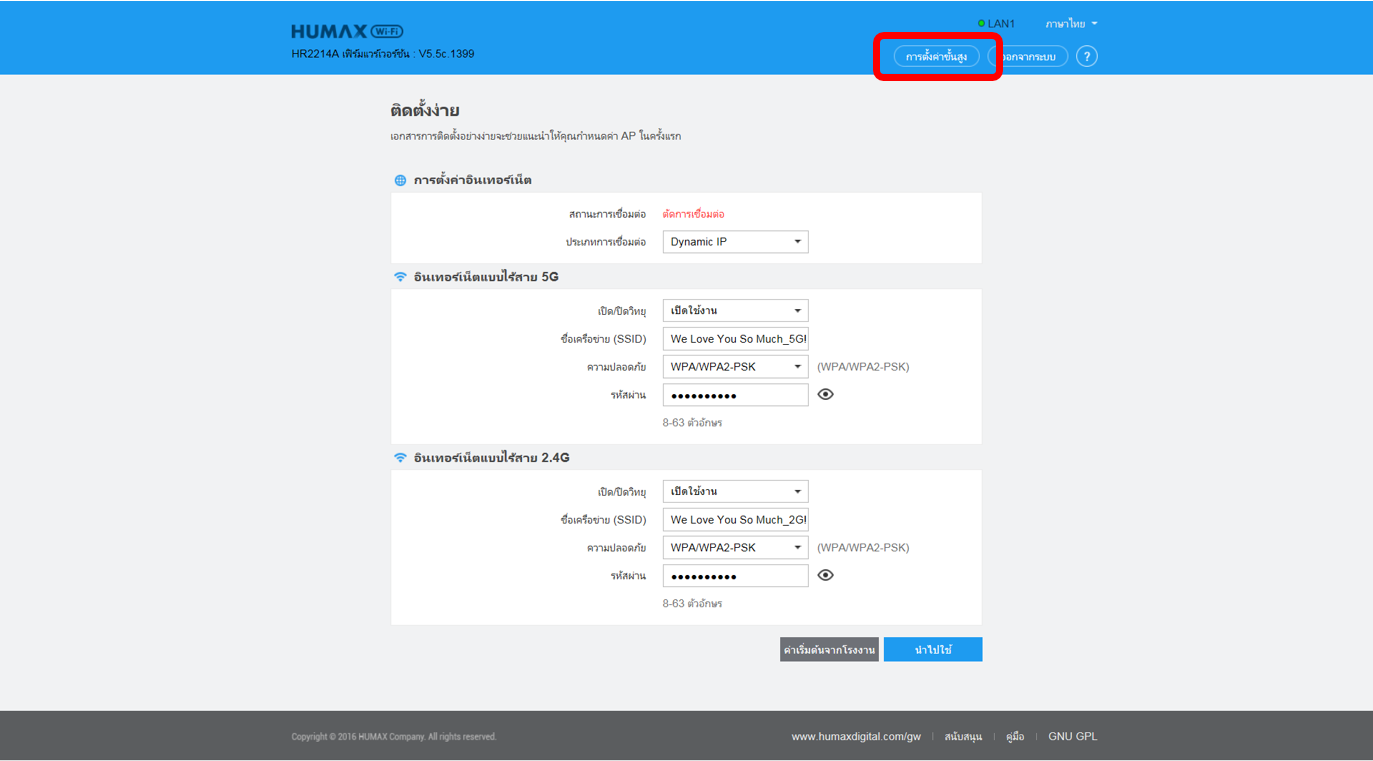
Click Advanced Setup button of the Easy Setup page
Step 3
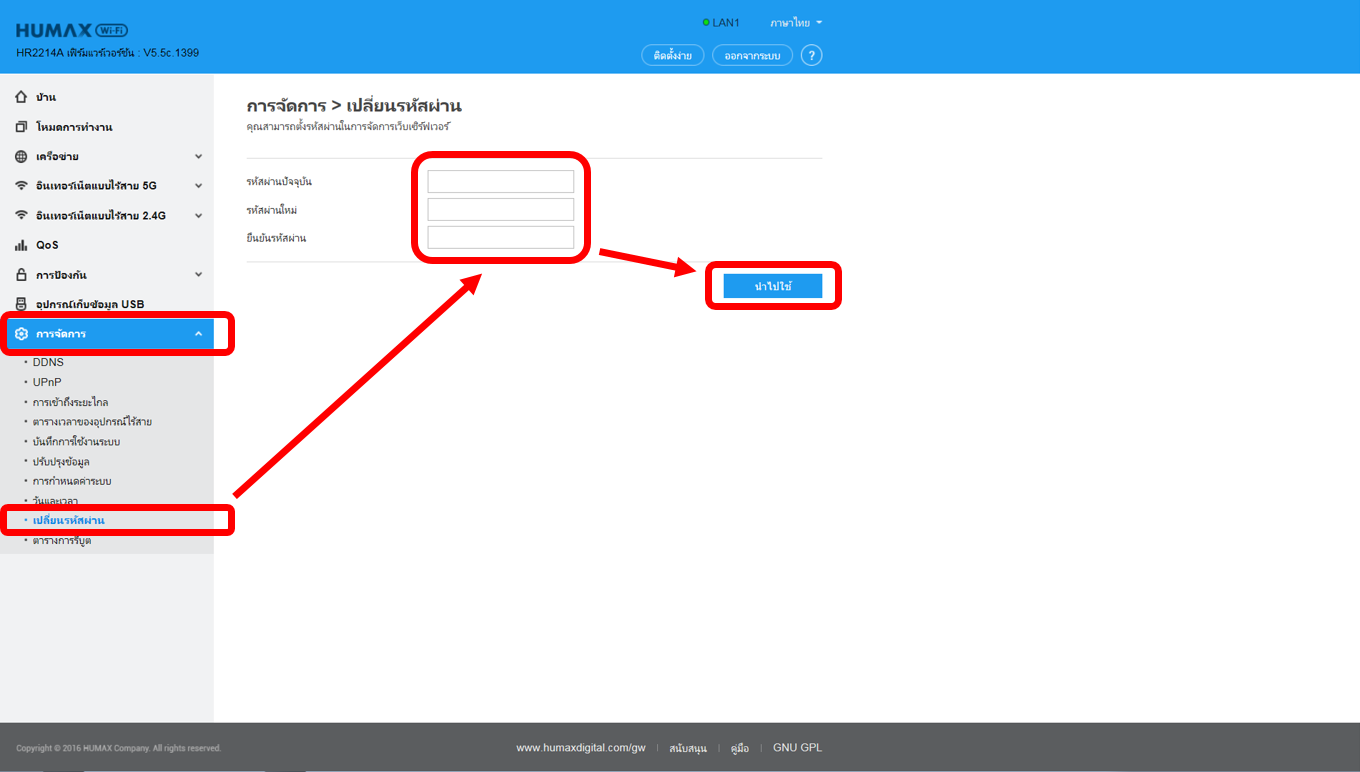
Click on Management ->Change Password on the left side, then you can change the router’s username and password on this page.
Step 4
Click Apply button, then you will view router status page and when you open another setting page, you can see the User Login page.
Note: Do not forget the new username and password. If you forgot them, you need to factory default setting.
Step 1
Log into the router’s web interface.
Step 2
Click Advanced Setup button of the Easy Setup page

Step 3
Click on Management ->Change Password on the left side, then you can change the router’s username and password on this page.

Step 4
Click Apply button, then you will view router status page and when you open another setting page, you can see the User Login page.
Note: Do not forget the new username and password. If you forgot them, you need to factory default setting.
What can I do if I forget the login password of router?
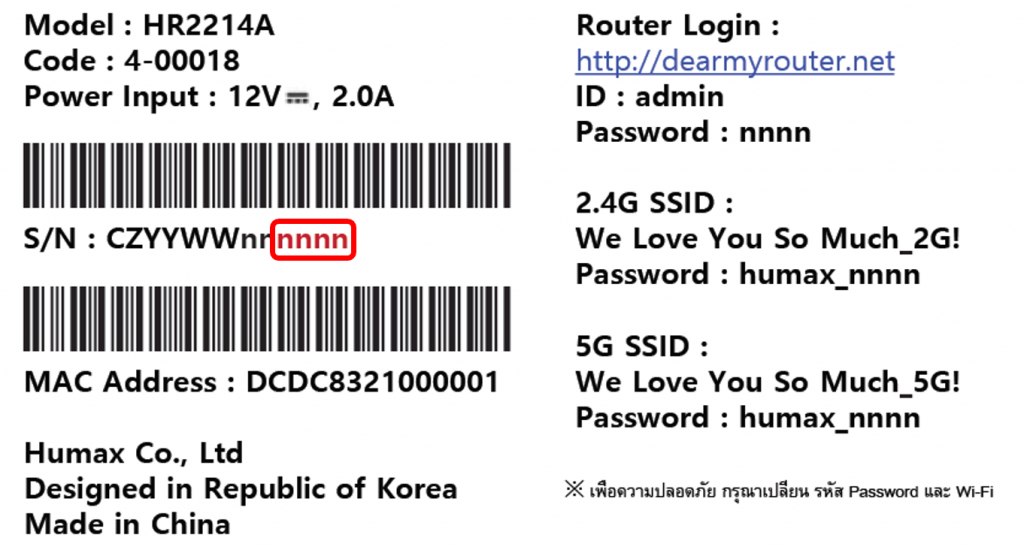
The default login username is “admin” and password is the 4 serial number at the bottom of your product “nnnn” as below. If you have changed the login password and you forgot, you need to reset it to factory default and configure it as a new one.
Step 1.
When the device is running, press the reset button on the rear panel using a pin for 10 seconds or more.

Step 2.
Release the reset button and wait for the device to reboot.
Note:
After reset to factory default, the default IP address is 192.168.1.1 and the default login username and password both are the same as above.
How to reset the current configuration to factory default?
If you can’t access the router’s setup interface or simply forgot the router’s password, you may reset the current configuration to factory default.
Step 1
Log into the router’s web interface.
Step 2
Click Advanced Setup button of the Easy Setup page
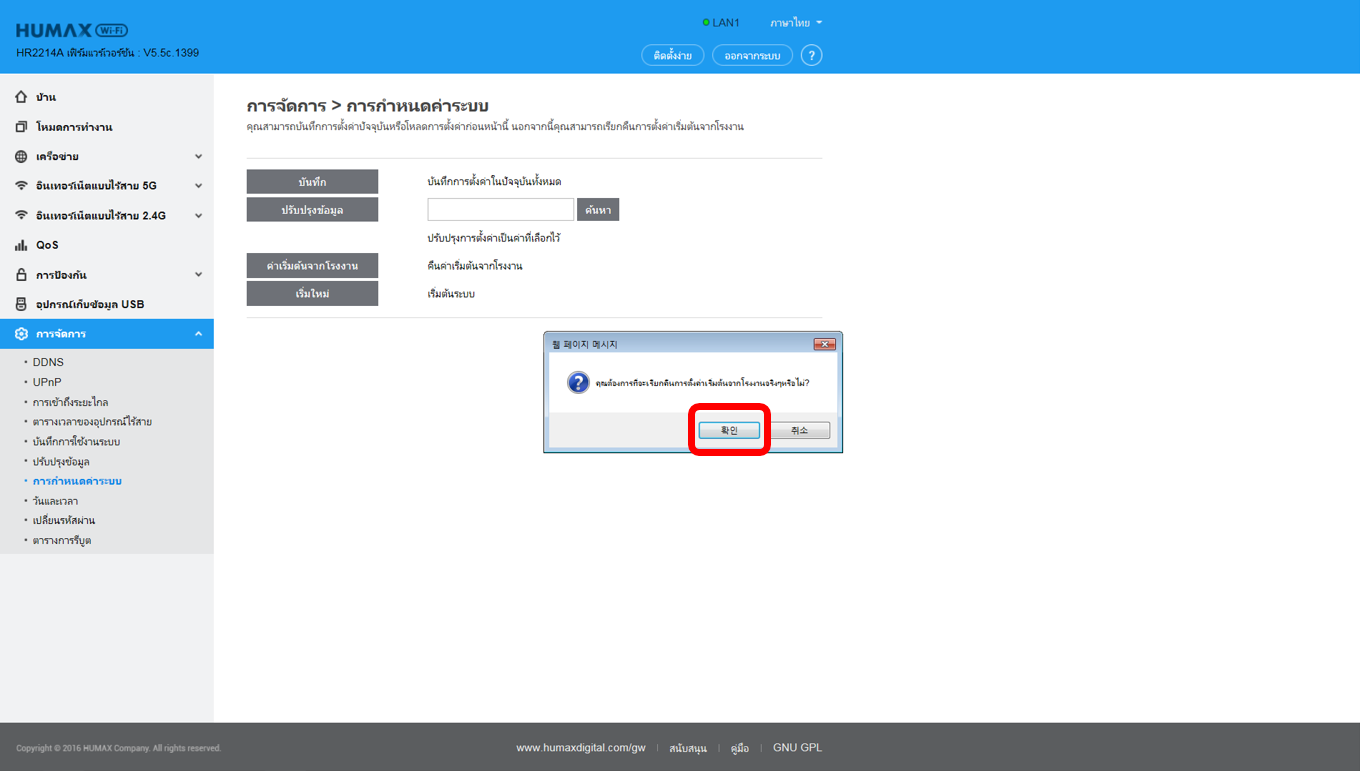
Step 3
Click on Management -> System Configuration on the left side, then click Factory Default button.

Step 4
Click OK and wait for few seconds to finish resetting.
Note:
After reset to factory default, refer to the default login username and password at the bottom of your product.
Step 1
Log into the router’s web interface.
Step 2
Click Advanced Setup button of the Easy Setup page

Step 3
Click on Management -> System Configuration on the left side, then click Factory Default button.

Step 4
Click OK and wait for few seconds to finish resetting.

Note:
After reset to factory default, refer to the default login username and password at the bottom of your product.
How do I physically connect my router?
Step 1
Plug in the cable modem power adapter and check the working of cable modem.
Step 2
Connect the HUMAX Wireless Router to the modem. Plug one end of an Ethernet cable to the modem and the other end into the internet port on the router. The internet port is yellow.
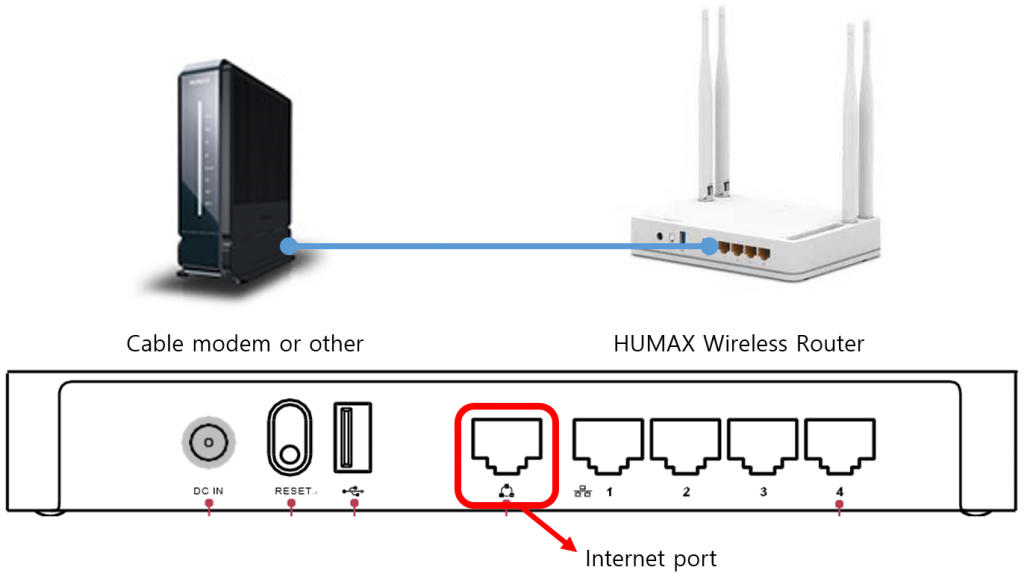
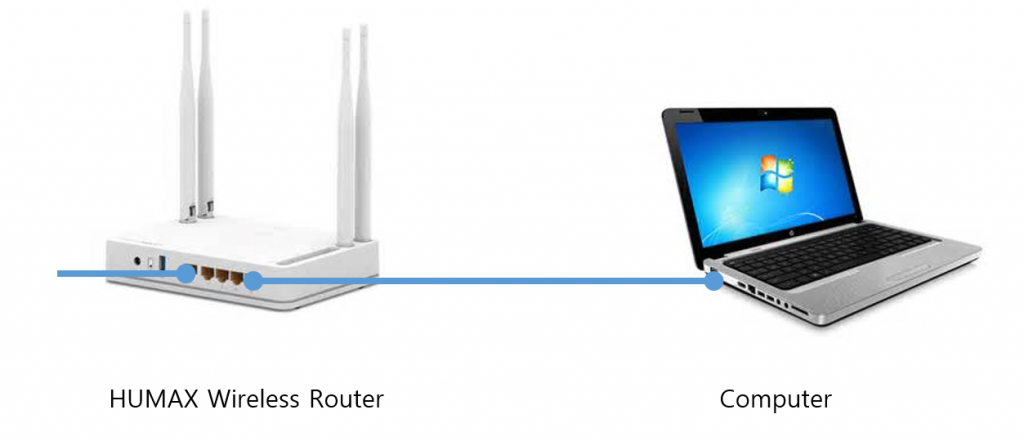
Step 3
Connect the router to the computer. Plug one end of an Ethernet cable into the computer Ethernet port and the other end into any one of the four LAN ports on the router.
Step 4
Plug in the router power adapter and check working of your Internet.
Plug in the cable modem power adapter and check the working of cable modem.
Step 2
Connect the HUMAX Wireless Router to the modem. Plug one end of an Ethernet cable to the modem and the other end into the internet port on the router. The internet port is yellow.

Step 3
Connect the router to the computer. Plug one end of an Ethernet cable into the computer Ethernet port and the other end into any one of the four LAN ports on the router.


Step 4
Plug in the router power adapter and check working of your Internet.
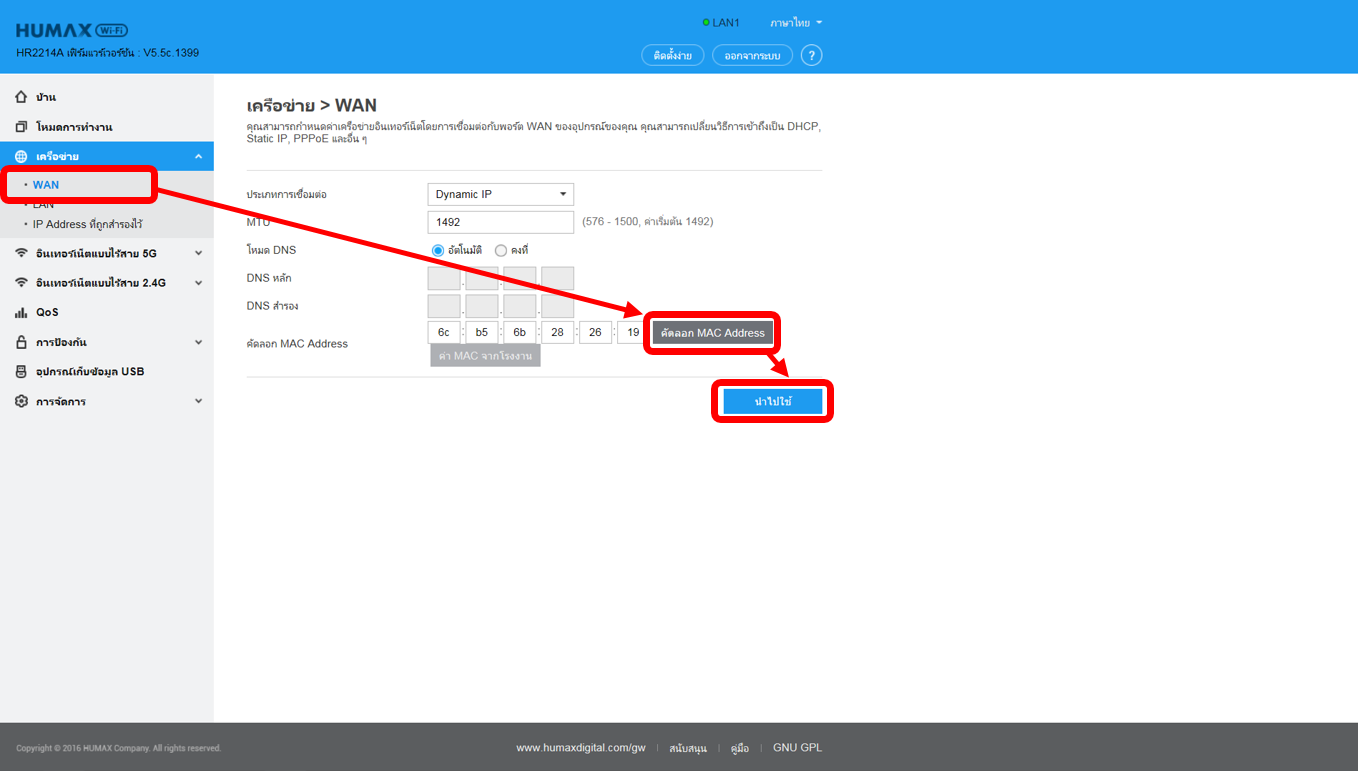
What’s MAC address clone used for and how to configure?
MAC address is the physical address of your computer’s network card. Generally, every network card has one unique Mac address. Since many ISPs only allow one computer in LAN to access Internet, users can enable MAC address clone function to make more computers surf Internet.
Step 1
Connect you PC to the router by cable or wireless.
Step 2
Log into the router’s web interface.
Step 3
Click Advanced Setup button of the Easy Setup page
Step 4
Click Network ->WAN settings -> MAC Clone button
Step 5
Click Apply
Step 1
Connect you PC to the router by cable or wireless.
Step 2
Log into the router’s web interface.
Step 3
Click Advanced Setup button of the Easy Setup page
Step 4
Click Network ->WAN settings -> MAC Clone button
Step 5
Click Apply

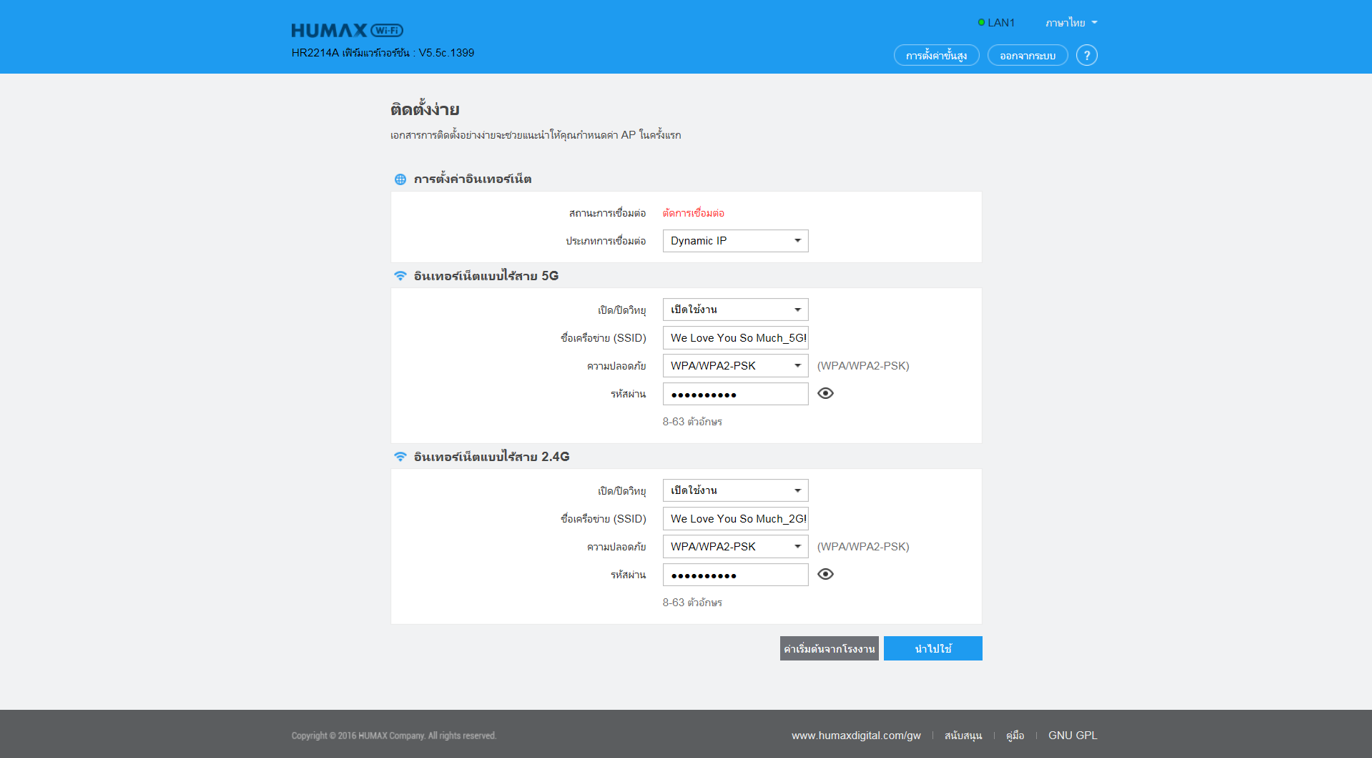
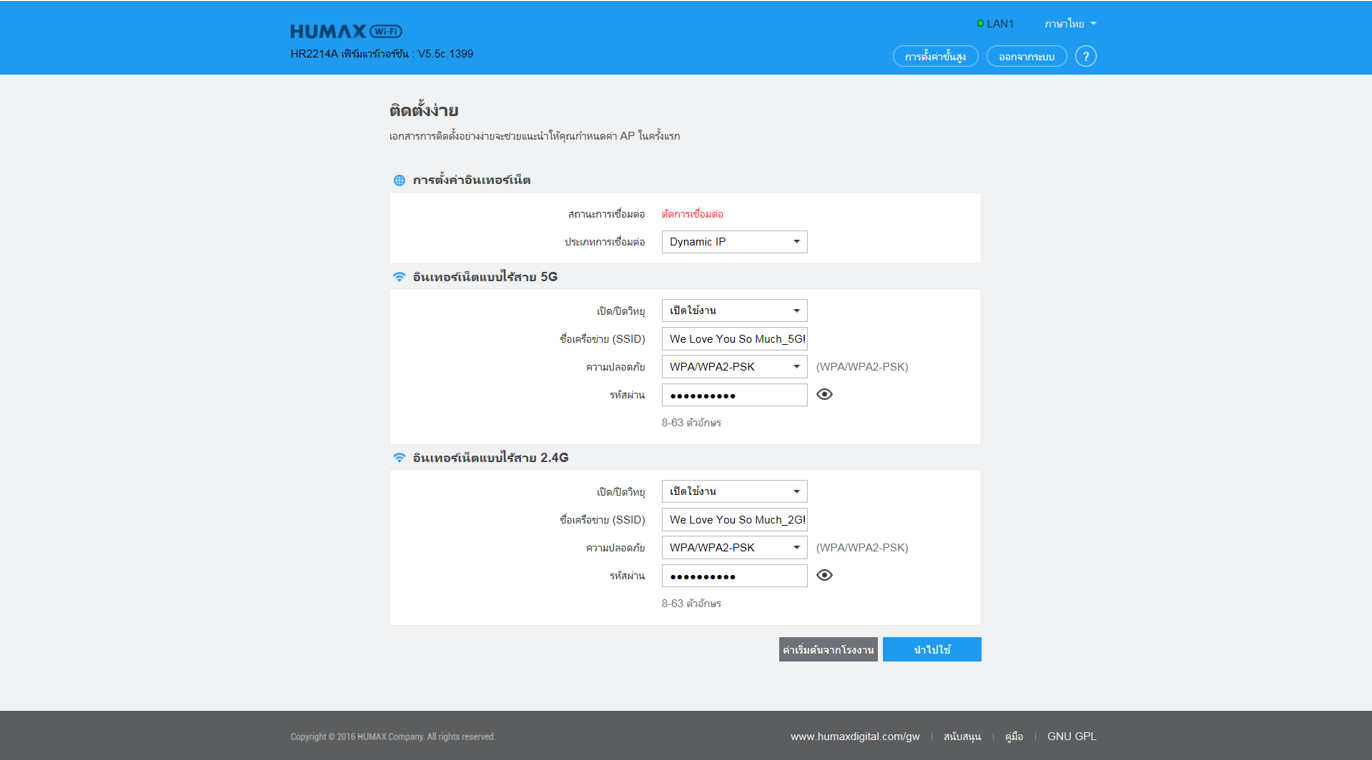
How to Configure Router’s Easy Setup?
Step 1
Log into the router’s web interface.
Step 2
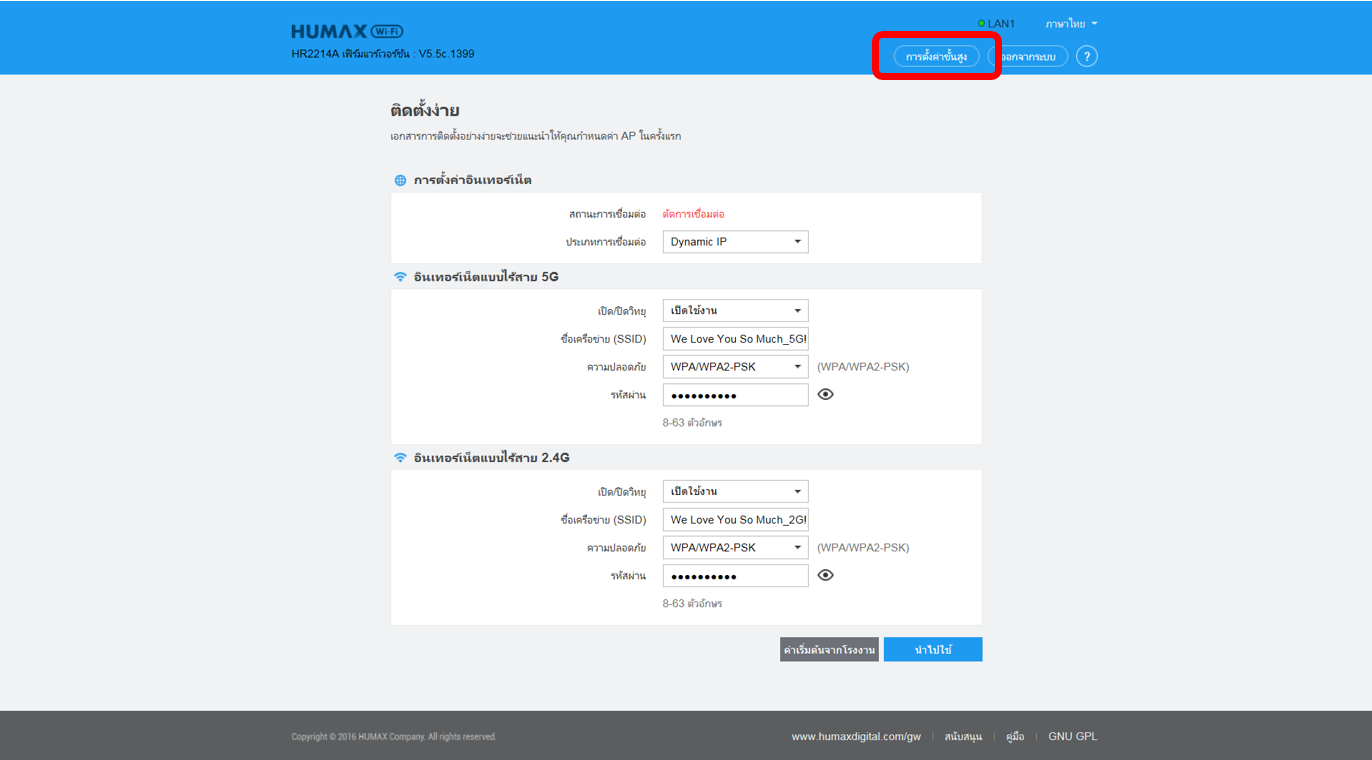
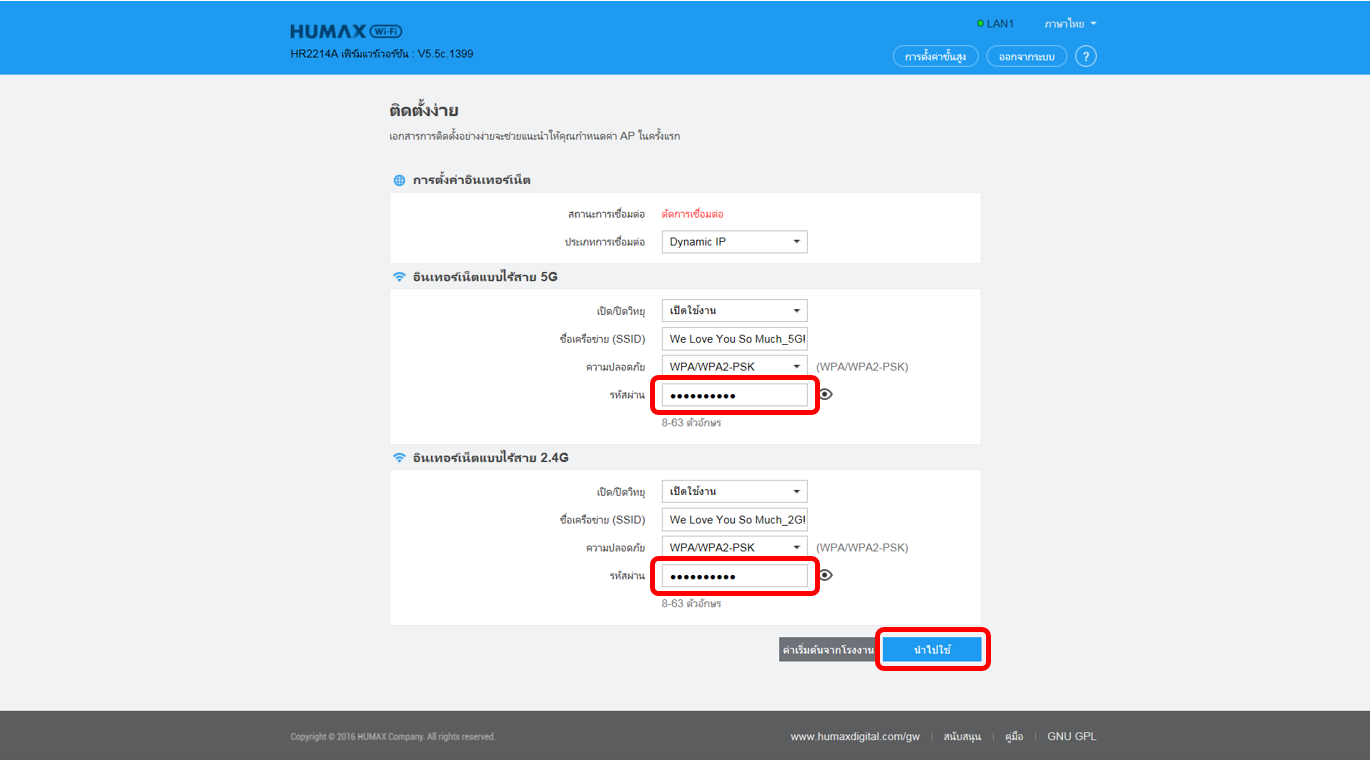
First, the Easy Setup page will turn up for basic and quick settings, including Internet Setting and Wireless Setting.
Step 3
Choose the WAN Access Type, enter User Name, Password provided by your ISP. Set an encryption method and password for your WiFi network.
Step 4
Click Apply to make the settings work.
Log into the router’s web interface.
Step 2
First, the Easy Setup page will turn up for basic and quick settings, including Internet Setting and Wireless Setting.

Step 3
Choose the WAN Access Type, enter User Name, Password provided by your ISP. Set an encryption method and password for your WiFi network.

Step 4
Click Apply to make the settings work.
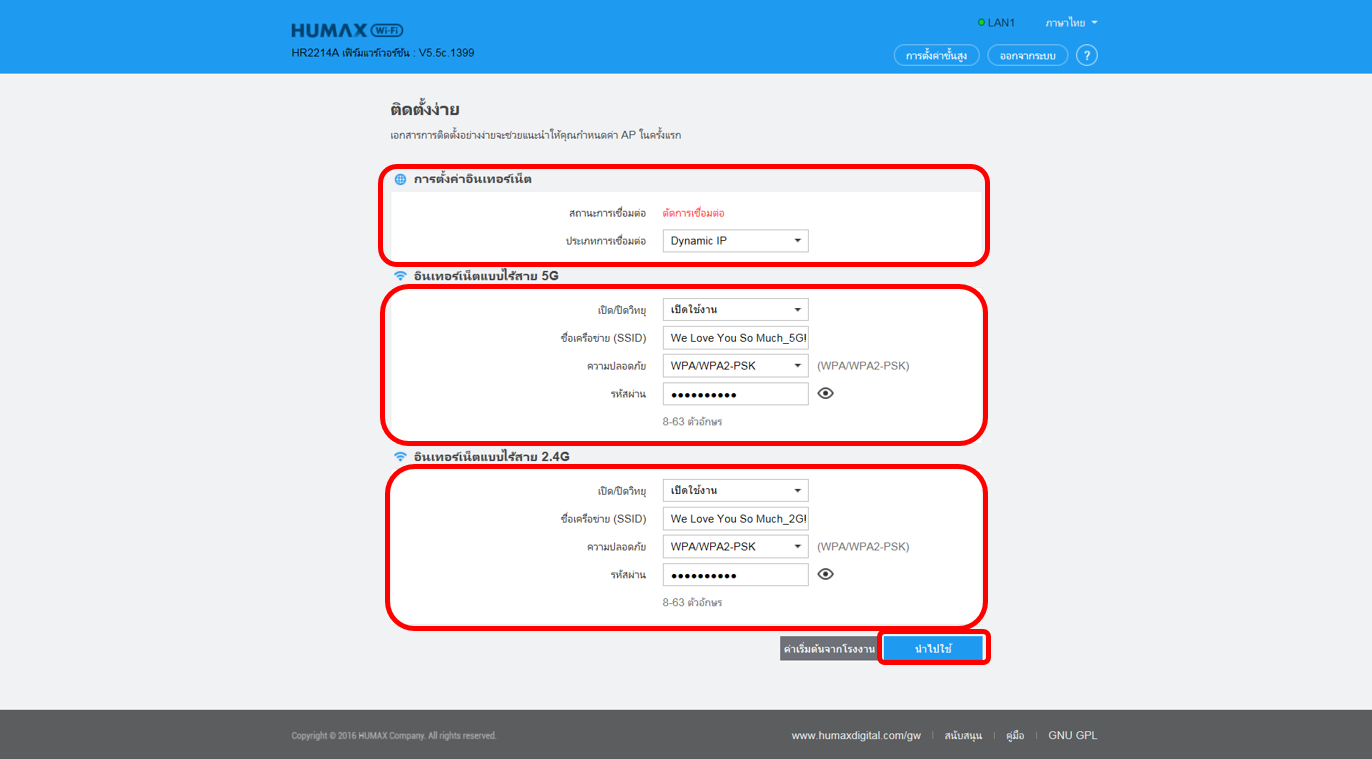
How to change the SSID of router?
If you want to change the SSID, please follow the steps below.
Method 1
Use the Easy setup to Change.
Step 1
Log into the router’s web interface.
Step 2
Click Advanced Setup button of the Easy Setup page.
Step 3
The Easy Setup page will turn up for basic and quick settings, including Internet Setting and Wireless Setting.

Step 4
Choose 5G Wireless Setting or 2.4G Wireless Setting, and input the new SSID, set the password for it and click Apply.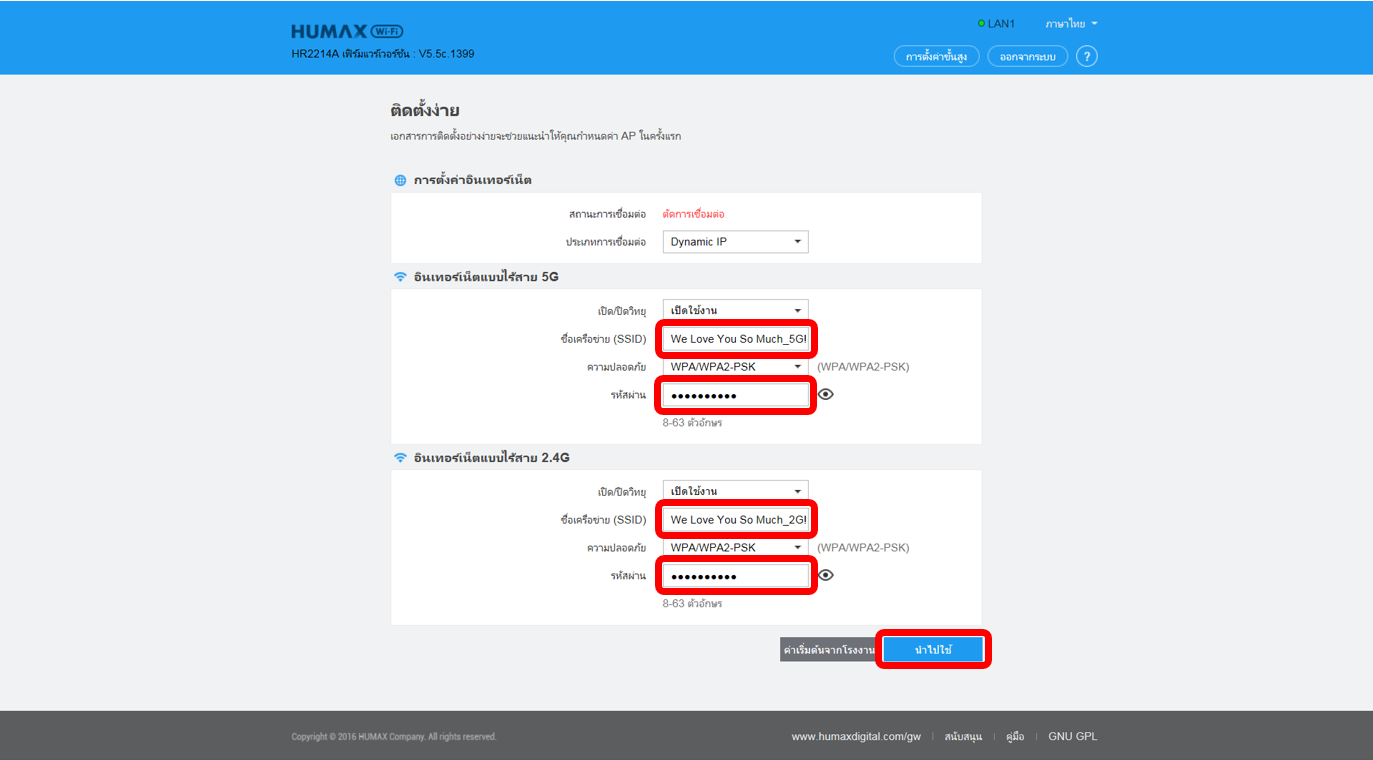

How to encrypt my wireless network?
If you want to encrypt your wireless network, please follow the below steps.
Step 1
Log into the router’s web interface.
Step 2
Click Advanced Setup button of the Easy Setup page.
Step 3
Click Wireless 5GHz -> Basic Settings on the left side, then you can change Encryption on this page.
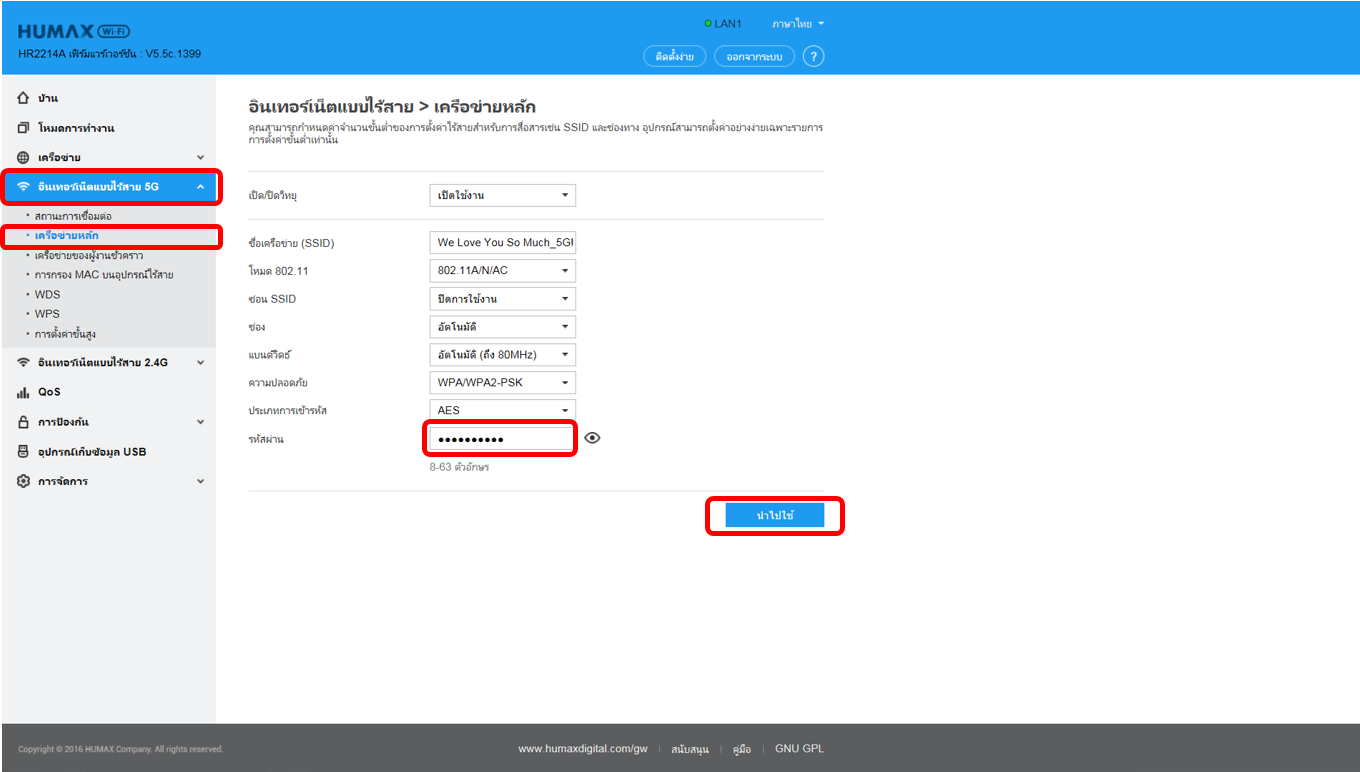
Step 4
If you change the Encryption type and input password key, Click Apply button.
Note:
1. WEP-Open System, WEP-Shared Key, WPA-PSK, WPA2-PSK and WPA/WPA2-PSK are provided for your, for better security, WPA/WPA2-PSK is recommended.
2. The Wireless 2.4GHz setting is the same as Wireless 5GHz setting.
What to do when you can’t find the router’s WiFi signal?
When you can’t find the SSID of the router even you have powered on the router? you can check the settings following these steps.
Step 1
Log into the router’s web interface.
Step 2
Click Advanced Setup button of the Easy Setup page.
Step 3
Click Wireless 5GHz -> Primary Network on the left side, then check if the Radio On/Off is Enable.
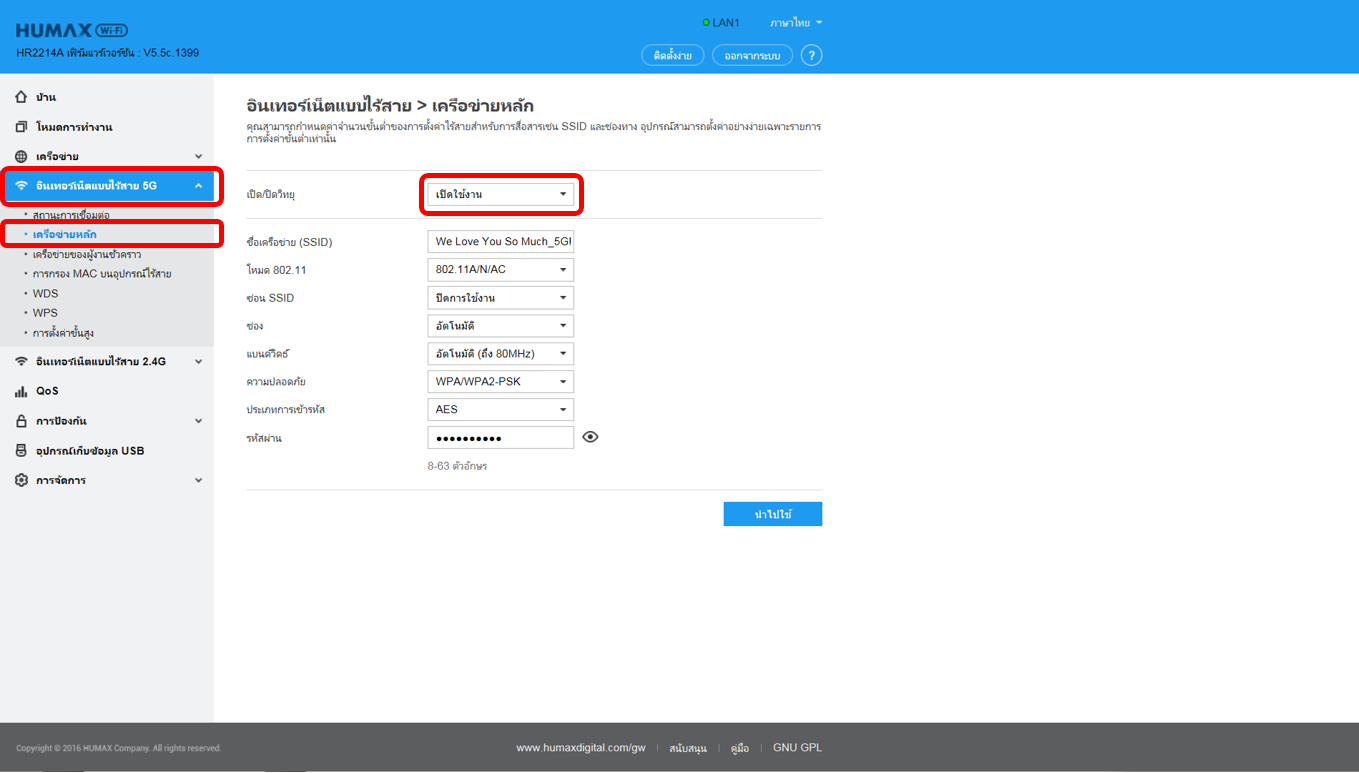
Note:
The Wireless 2.4GHz setting is the same as Wireless 5GHz setting.
Step 1
Log into the router’s web interface.
Step 2
Click Advanced Setup button of the Easy Setup page.
Step 3
Click Wireless 5GHz -> Primary Network on the left side, then check if the Radio On/Off is Enable.

Note:
The Wireless 2.4GHz setting is the same as Wireless 5GHz setting.
What can I do if I forget the password for WiFi connection?
Password can ensure your security of your wireless network. If you forgot the WiFi password, you cannot find it. Please follow these steps. There are two ways to.
Method 1
If you know the user ID and password for interface of router, you can change WiFi password.
Step 1
Log into the router’s web interface.
Step 2
The Easy Setup page will turn up for basic and quick settings, including Internet Setting and Wireless Setting.
Step 3
Choose 5G Wireless Setting or 2.4G Wireless Setting, and set the password for it and click Apply.
Note:
For better security, WPA/WPA2-PSK is recommended.
Method 2
If you do not know user ID and password, you need reset it to factory default and configure it as a new one.
Step 1.
When the device is running, press the reset button on the rear panel using a pin for 10 seconds or more.

Step 2.
Release the reset button and wait for the device to reboot.
Note:
After reset to factory default, the default IP address is 192.168.1.1 and refer to the default login username and password at the bottom of your product.
Method 1
If you know the user ID and password for interface of router, you can change WiFi password.
Step 1
Log into the router’s web interface.
Step 2
The Easy Setup page will turn up for basic and quick settings, including Internet Setting and Wireless Setting.

Step 3
Choose 5G Wireless Setting or 2.4G Wireless Setting, and set the password for it and click Apply.

Note:
For better security, WPA/WPA2-PSK is recommended.
Method 2
If you do not know user ID and password, you need reset it to factory default and configure it as a new one.
Step 1.
When the device is running, press the reset button on the rear panel using a pin for 10 seconds or more.

Step 2.
Release the reset button and wait for the device to reboot.
Note:
After reset to factory default, the default IP address is 192.168.1.1 and refer to the default login username and password at the bottom of your product.
How to connect to wireless networks on various operating systems?
Choose the operating system of your device.
For Windows XP:
Step 1
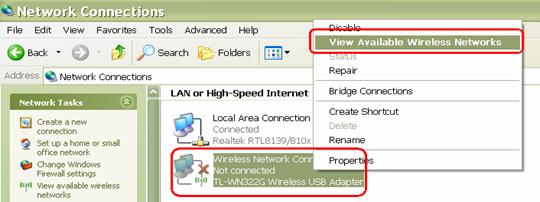
Open Control panel, select and double click Network Connections.
Step 2
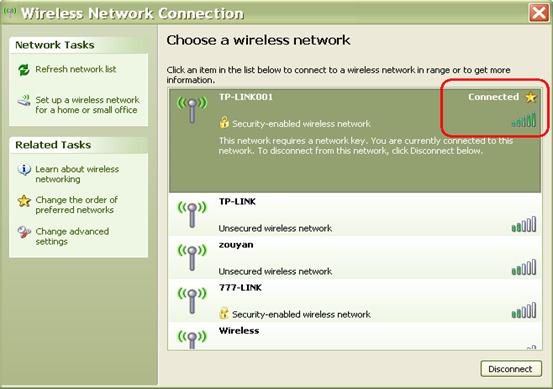
Right click Wireless Network Connection, select and click View Available Wireless Networks.
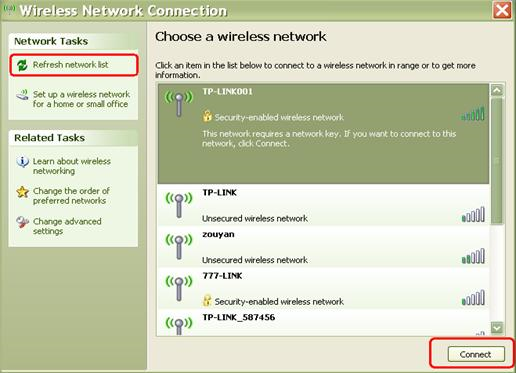
Step 3
Click Refresh Network list to view available wireless networks. Select the one you would like to connect; double click it or click Connect button.
Step 4
If the wireless network is secured, there will pop up a window requiring key/password.
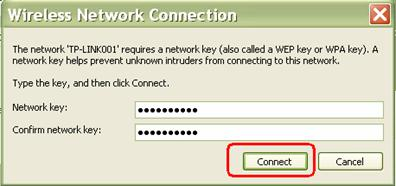
Step 5
Enter the correct Key/Password then click Connect. In a short while, a wireless connection is set up.
For Windows Windows 7/Windows Vista:
The process regarding wireless connection is quite similar on these two platforms.
Step 1
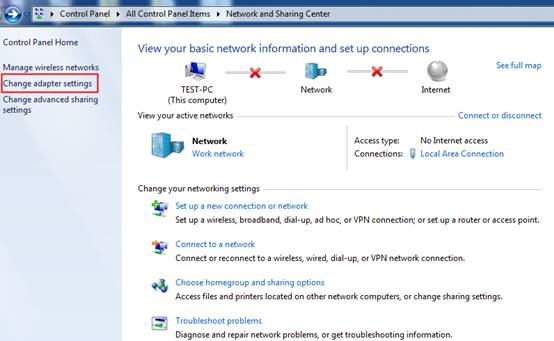
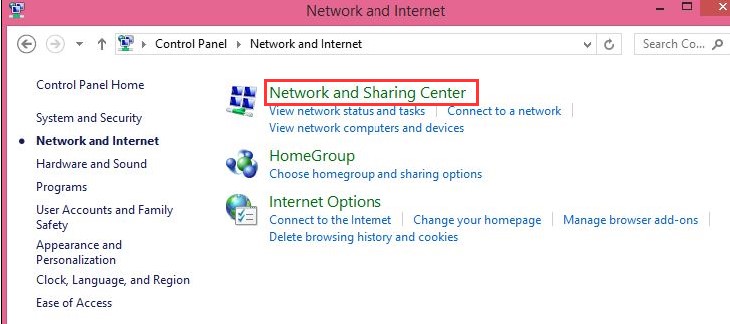
Click Start -> Control Panel, Select and click Network and Sharing Center (or Network and Internet-> View network status and tasks)
Step 2
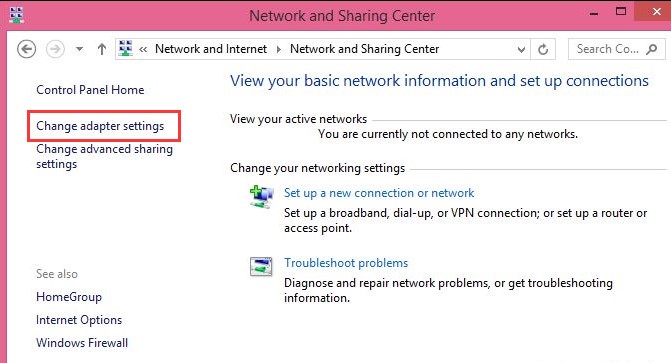
Now on Widows 7, click Change adapter settings.
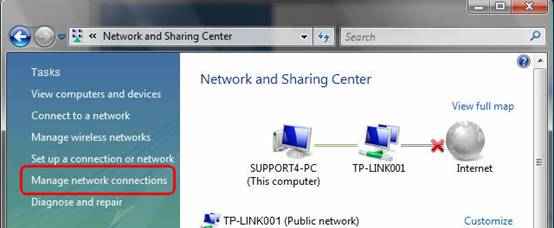
On Windows Vista, click Manage network connections.
Step 3
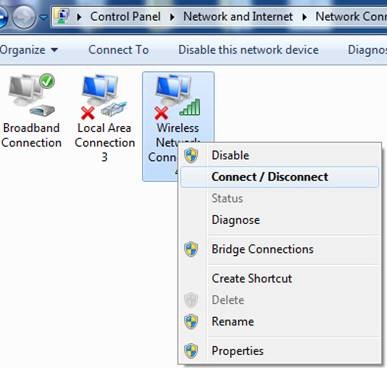
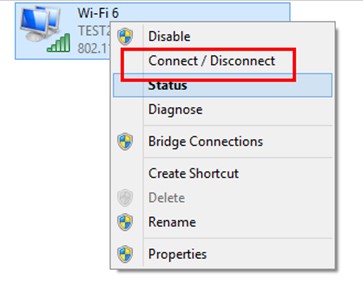
Select wireless network connection, right click it and select Connect/Disconnect.
Step 4
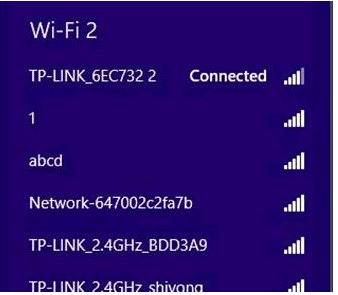
At the lower right corner, there pops up a window displaying Wi-Fi signals around. Click Refresh button to view wireless networks. Choose the one you would like to connect, then double click it or click Connect.
Step 5
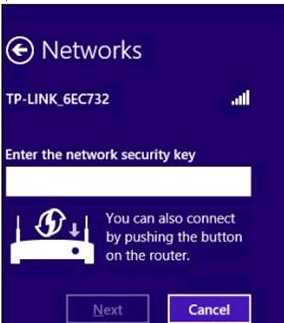
If that is a secured network, a password or security key will be requested. Put in your Wi-Fi password and click OK.
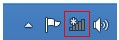
In a short while, you can see the Wi-Fi icon in the task bar showing that it is connected.

For Windows 8:
Step 1
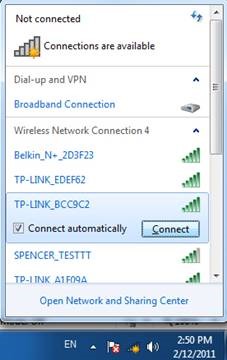
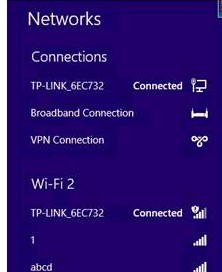
Click the Wi-Fi icon at the lower right corner in the task tray, and it will bring out a list of all the available wireless signals nearby;
Or you can get this Wi-Fi list via control panel as instructed below:
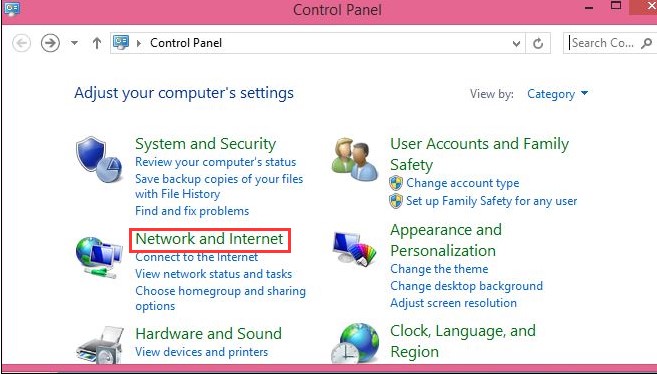
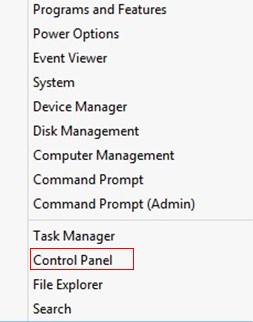
1) Press “windows key +X” on the keyboard, and choose “Control Panel”;

2) Now navigate your way to Wi-Fi connection by way of “Network and Internet and Network and Sharing Center and Change Adapter Settings”
3) Right click on “Wi-Fi” and choose “Connect/Disconnect” and now you can see all the wireless networks around.

Step 2
Choose your Wi-Fi network and press “connect”;
Step 3
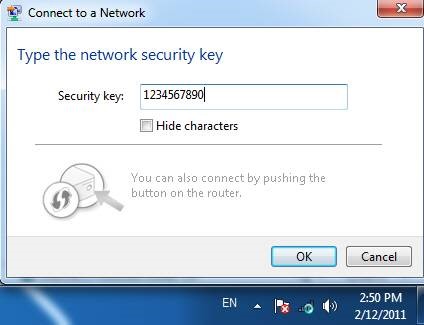
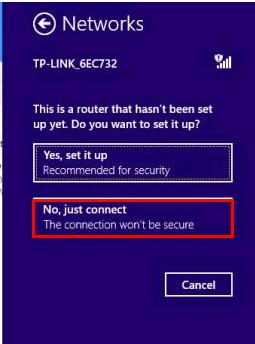
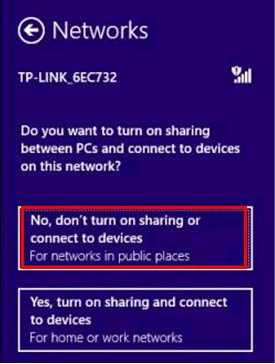
If that is a secured network, a security key will be required. Type in your wireless password and press next;
Now it is connected.
Note: If your Wi-Fi network is open, you may see a box like below, just select “No, just connect”.
Now it is connected.
For Windows 10:
Step 1
Click the Wi-Fi icon at the lower right corner in the task tray, and it will bring out a list of all the available wireless signals nearby;

Or you can get this Wi-Fi list via control panel as instructed below:
1) Press “windows key +X” on the keyboard, and choose “Control Panel”;
2) Now navigate your way to Wi-Fi connection by way of “Network and Internet”--- “Network and Sharing Center” --- “Change Adapter Settings”;
3) Right click on “Wi-Fi” and choose “Connect/Disconnect” and now you can see all the wireless networks around.
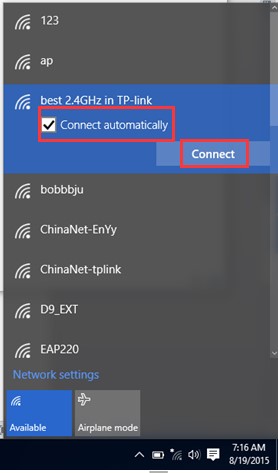
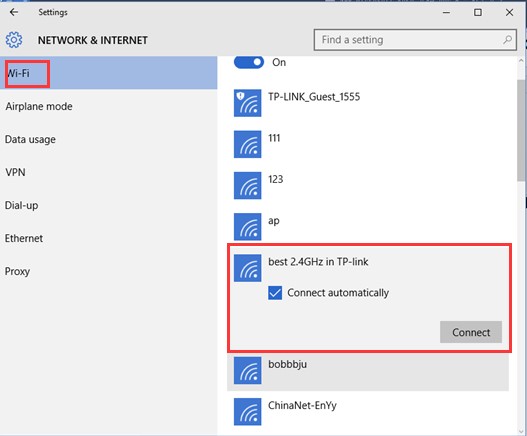
Step 2
Choose your Wi-Fi network, check “Connect automatically” and press “connect”;
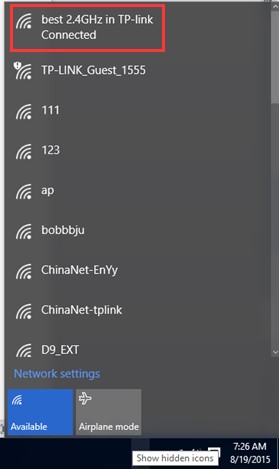
Step 3
If it is a secured network, a security key will be required. Type in your wireless password and press “next”;

Now it is connected.
How to forget its profile?
Solution 1
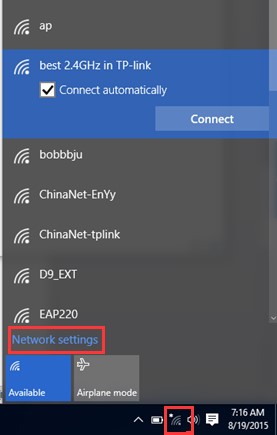
Step 1
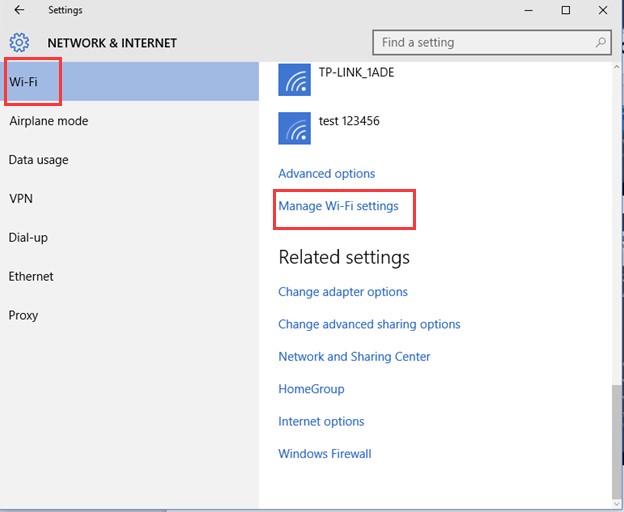
Click the Wi-Fi icon at the lower right corner in the task tray, and click “Network settings”;
Step 2
Then please click on “Wi-fi” and find “Manage Wi-fi settings” on the left menu;
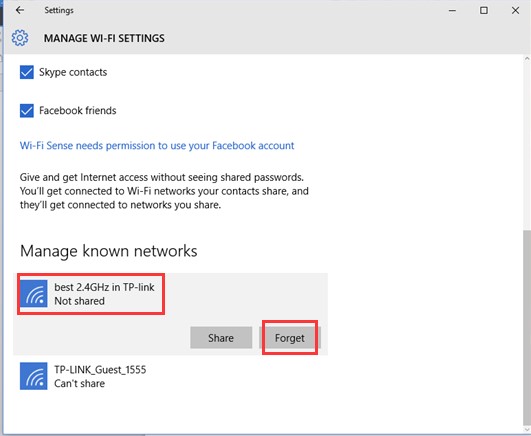
Step 3
Highlight the wifi and click on “Forget”;
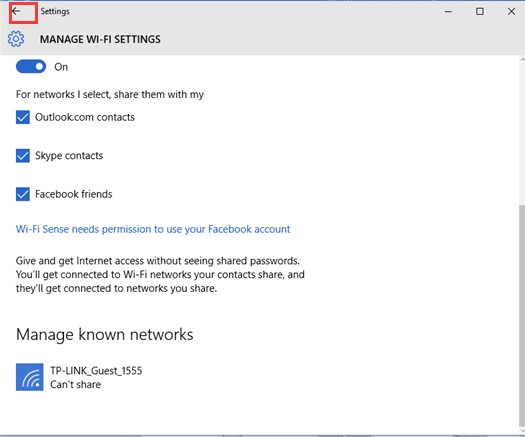
Step 4
Then please click on the “back” icon on the top and choose the wifi that you want to connect.
Solution 2
Step 1
Please go to the control panel page, and please click on “Network and Internet”--“Network and Sharing Center”--“Change Adapter Settings”(on the left)”;
Step 2
Then right click on “Wi-Fi” and go to “Connect/disconnect”;
You will see the same “Network and Internet” window showed on the step2 of the Solution1, so please go the same process to forget profile.
For MAC OS:
There are two ways to connect to a wireless network on MacBook.
Method 1:
Step 1
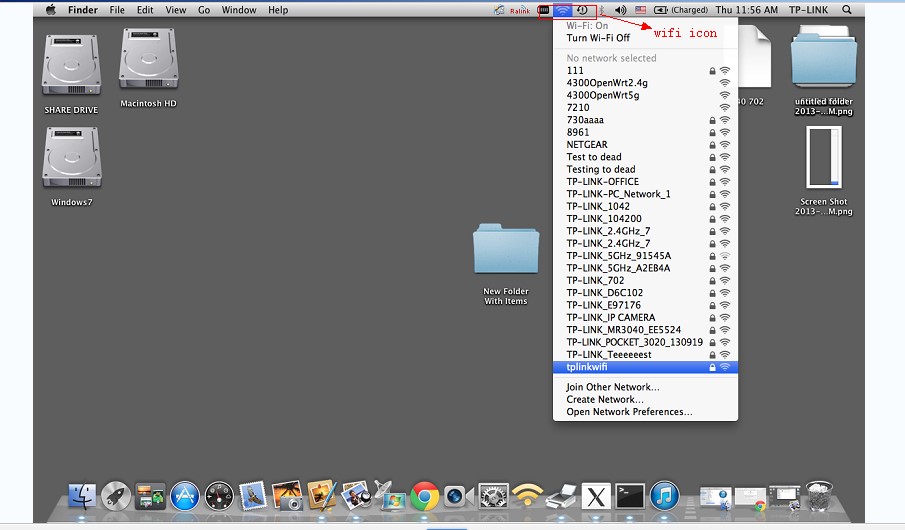
Click the Wi-Fi icon in the very top task bar of your MacBook and choose your Wi-Fi network.
Step 2
Put in your Wi-Fi password and click on Join.

Method 2:
Step 1
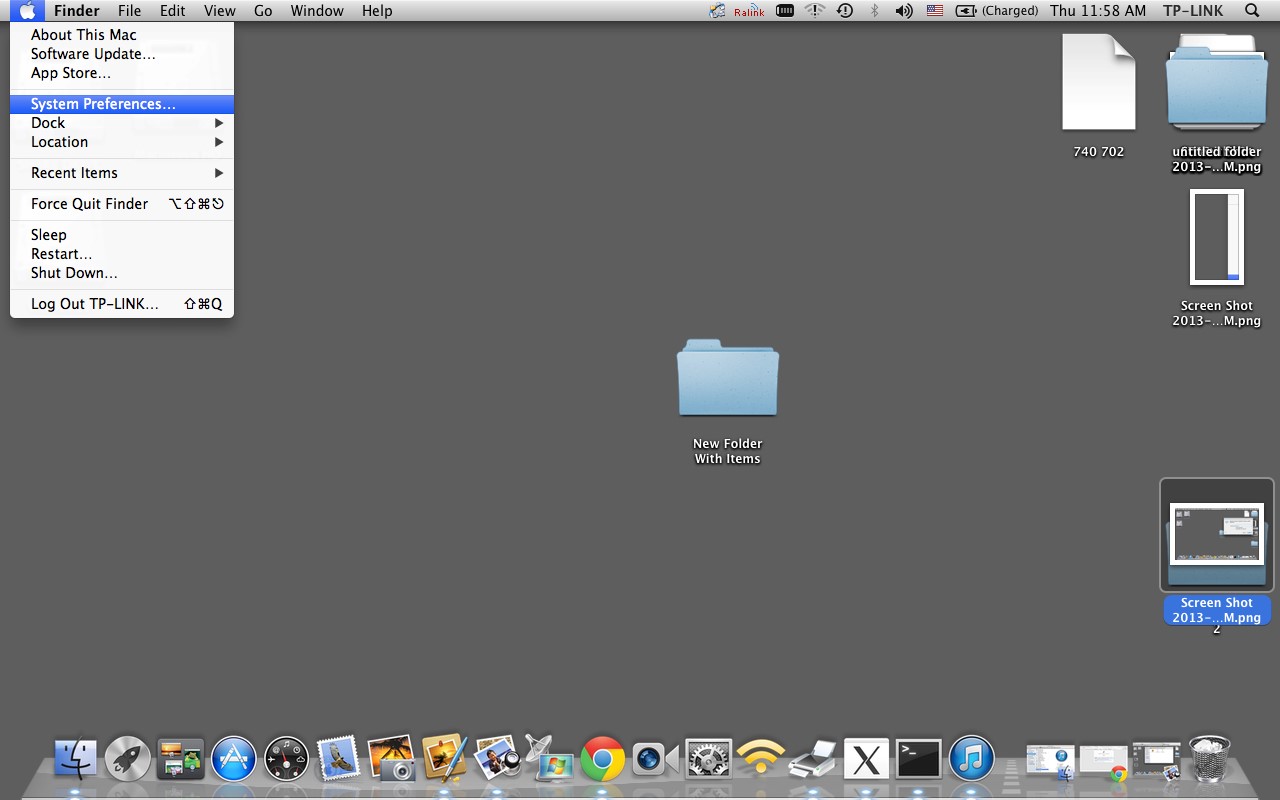
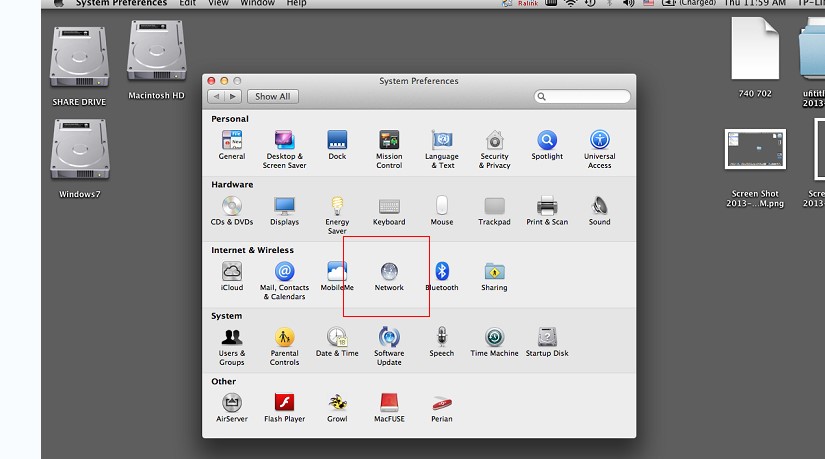
Navigate your way to Wi-Fi connection via -------> System preferences -----> Network -----> Wi-Fi
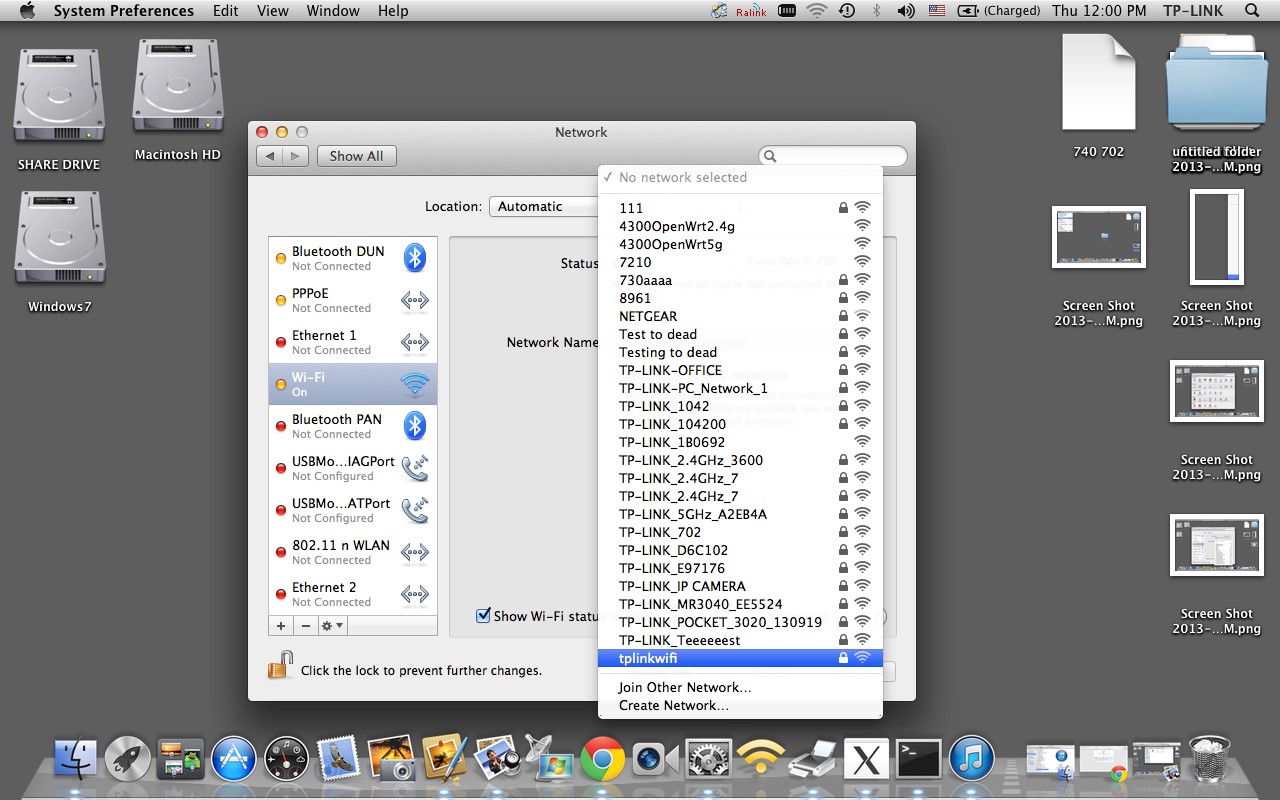
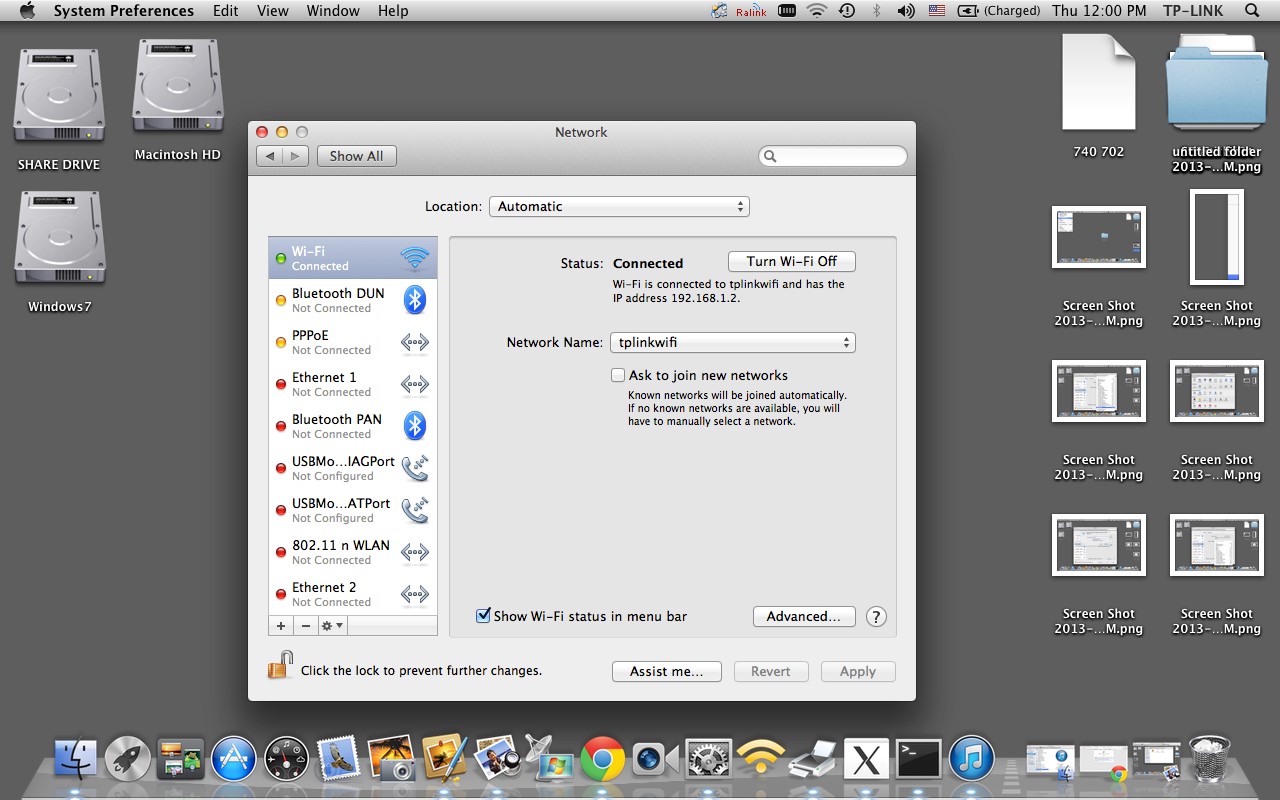
Step 2
Click network and drop down the Wi-Fi menu; choose your Wi-Fi network among all others. Here we take “tplinkwifi” as an example.
Step 3
Fill in the password which is case sensitive and press Join.
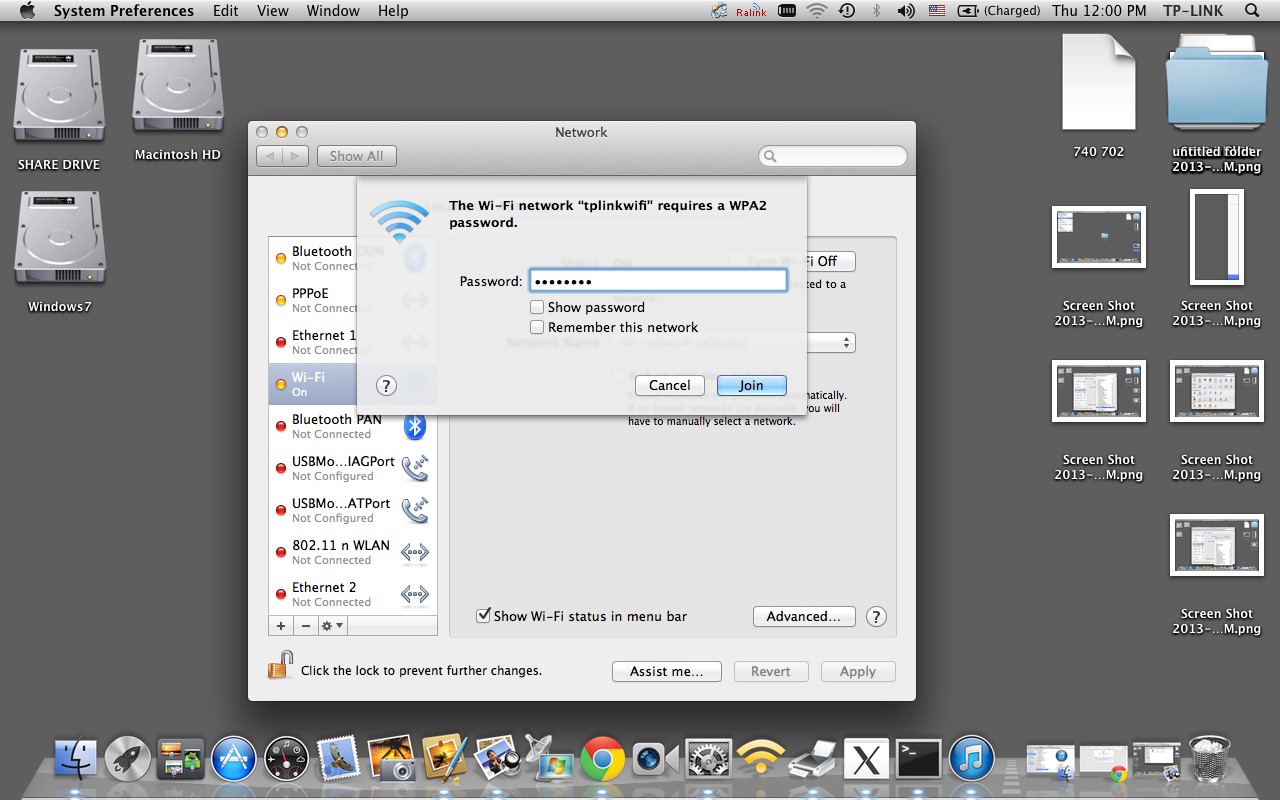
Finally, Wi-Fi status shows Connected when the wireless connection is successfully set up.
For iOS:
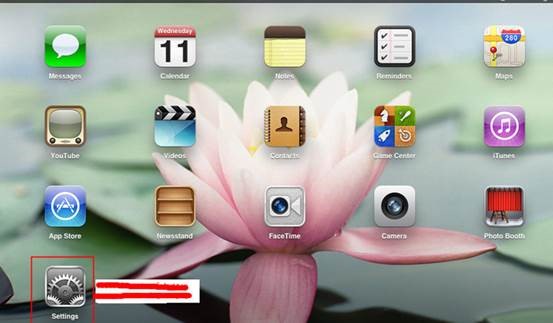
Step 1
Tap on settings
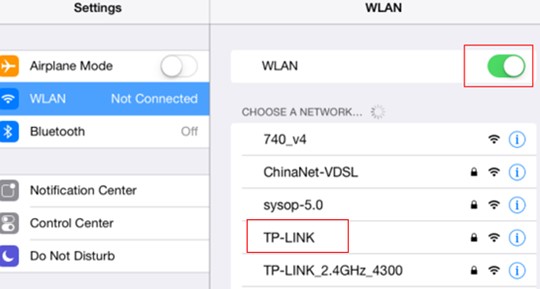
Step 2
Tap on the WLAN; make sure Wi-Fi is on and then tap on your own Wi-Fi network
Step 3
Key in your Wi-Fi password and tap on Join.

Step 4
A check mark appears next to the Wi-Fi network when it is connected.

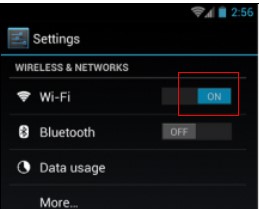
For Android:
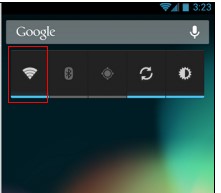
Step 1
Go to Settings and turn on Wlan, which may also be named Wireless and Networks or Wi-Fi.

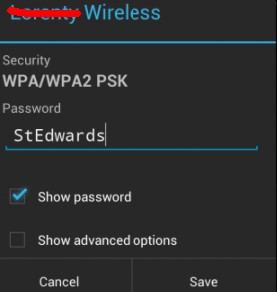
Step 2
Enter Wireless and Network/Wlan/Wi-Fi and choose the Wi-Fi network you want to connect; Input your Wi-Fi password which is case sensitive, and connect.

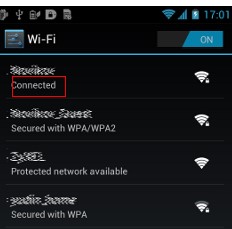
Step 3
Now the Wi-Fi shows “connected” and Wi-Fi symbol turns green; It’s ready to use.
For Windows XP:
Step 1
Open Control panel, select and double click Network Connections.
Step 2
Right click Wireless Network Connection, select and click View Available Wireless Networks.

Step 3
Click Refresh Network list to view available wireless networks. Select the one you would like to connect; double click it or click Connect button.

Step 4
If the wireless network is secured, there will pop up a window requiring key/password.

Step 5
Enter the correct Key/Password then click Connect. In a short while, a wireless connection is set up.

For Windows Windows 7/Windows Vista:
The process regarding wireless connection is quite similar on these two platforms.
Step 1
Click Start -> Control Panel, Select and click Network and Sharing Center (or Network and Internet-> View network status and tasks)
Step 2
Now on Widows 7, click Change adapter settings.

On Windows Vista, click Manage network connections.

Step 3
Select wireless network connection, right click it and select Connect/Disconnect.

Step 4
At the lower right corner, there pops up a window displaying Wi-Fi signals around. Click Refresh button

Step 5
If that is a secured network, a password or security key will be requested. Put in your Wi-Fi password and click OK.

In a short while, you can see the Wi-Fi icon in the task bar showing that it is connected.

For Windows 8:
Step 1
Click the Wi-Fi icon at the lower right corner in the task tray, and it will bring out a list of all the available wireless signals nearby;
Or you can get this Wi-Fi list via control panel as instructed below:
1) Press “windows key +X” on the keyboard, and choose “Control Panel”;

2) Now navigate your way to Wi-Fi connection by way of “Network and Internet and Network and Sharing Center and Change Adapter Settings”


3) Right click on “Wi-Fi” and choose “Connect/Disconnect” and now you can see all the wireless networks around.

Step 2
Choose your Wi-Fi network and press “connect”;
Step 3
If that is a secured network, a security key will be required. Type in your wireless password and press next;

Now it is connected.

Note: If your Wi-Fi network is open, you may see a box like below, just select “No, just connect”.


Now it is connected.

For Windows 10:
Step 1
Click the Wi-Fi icon at the lower right corner in the task tray, and it will bring out a list of all the available wireless signals nearby;

Or you can get this Wi-Fi list via control panel as instructed below:
1) Press “windows key +X” on the keyboard, and choose “Control Panel”;

2) Now navigate your way to Wi-Fi connection by way of “Network and Internet”--- “Network and Sharing Center” --- “Change Adapter Settings”;
3) Right click on “Wi-Fi” and choose “Connect/Disconnect” and now you can see all the wireless networks around.

Step 2
Choose your Wi-Fi network, check “Connect automatically” and press “connect”;

Step 3
If it is a secured network, a security key will be required. Type in your wireless password and press “next”;

Now it is connected.

How to forget its profile?
Solution 1
Step 1
Click the Wi-Fi icon at the lower right corner in the task tray, and click “Network settings”;

Step 2
Then please click on “Wi-fi” and find “Manage Wi-fi settings” on the left menu;

Step 3
Highlight the wifi and click on “Forget”;

Step 4
Then please click on the “back” icon on the top and choose the wifi that you want to connect.


Solution 2
Step 1
Please go to the control panel page, and please click on “Network and Internet”--“Network and Sharing Center”--“Change Adapter Settings”(on the left)”;
Step 2
Then right click on “Wi-Fi” and go to “Connect/disconnect”;
You will see the same “Network and Internet” window showed on the step2 of the Solution1, so please go the same process to forget profile.
For MAC OS:
There are two ways to connect to a wireless network on MacBook.
Method 1:
Step 1
Click the Wi-Fi icon in the very top task bar of your MacBook and choose your Wi-Fi network.

Step 2
Put in your Wi-Fi password and click on Join.

Method 2:
Step 1
Navigate your way to Wi-Fi connection via


Step 2
Click network and drop down the Wi-Fi menu; choose your Wi-Fi network among all others. Here we take “tplinkwifi” as an example.

Step 3
Fill in the password which is case sensitive and press Join.

Finally, Wi-Fi status shows Connected when the wireless connection is successfully set up.

For iOS:
Step 1
Tap on settings

Step 2
Tap on the WLAN; make sure Wi-Fi is on and then tap on your own Wi-Fi network

Step 3
Key in your Wi-Fi password and tap on Join.

Step 4
A check mark appears next to the Wi-Fi network when it is connected.

For Android:
Step 1
Go to Settings and turn on Wlan, which may also be named Wireless and Networks or Wi-Fi.


Step 2
Enter Wireless and Network/Wlan/Wi-Fi and choose the Wi-Fi network you want to connect; Input your Wi-Fi password which is case sensitive, and connect.


Step 3
Now the Wi-Fi shows “connected” and Wi-Fi symbol turns green; It’s ready to use.


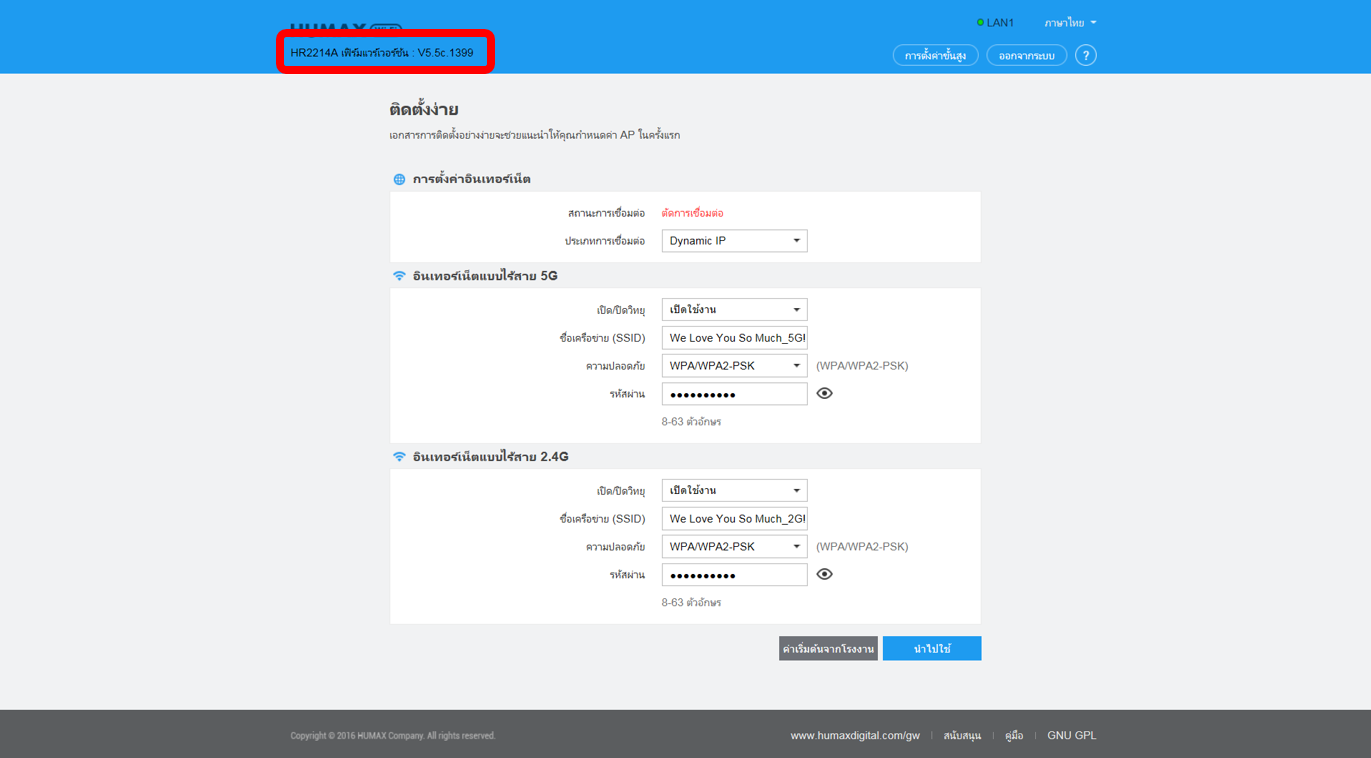
How do I check the Firmware version on router?
If you want to know the firmware version of router for firmware upgrade, please follow step below.
Step 1
Log into the router’s web interface.
Step 2
Easy Setup page will turn up, then you can see the model name and firmware version.
Step 1
Log into the router’s web interface.
Step 2
Easy Setup page will turn up, then you can see the model name and firmware version.

How to upgrade router’s firmware to the latest version?
New version of firmware will be released to improve the various efficiency or to fix some bugs. Following the steps show below so as to realize upgrading.
Step 1
Log into the router’s web interface.
Step 2
Click Advanced Setup button of the Easy Setup page.
Step 3
Click Management -> Update Firmware on the left side, then click Browse button.
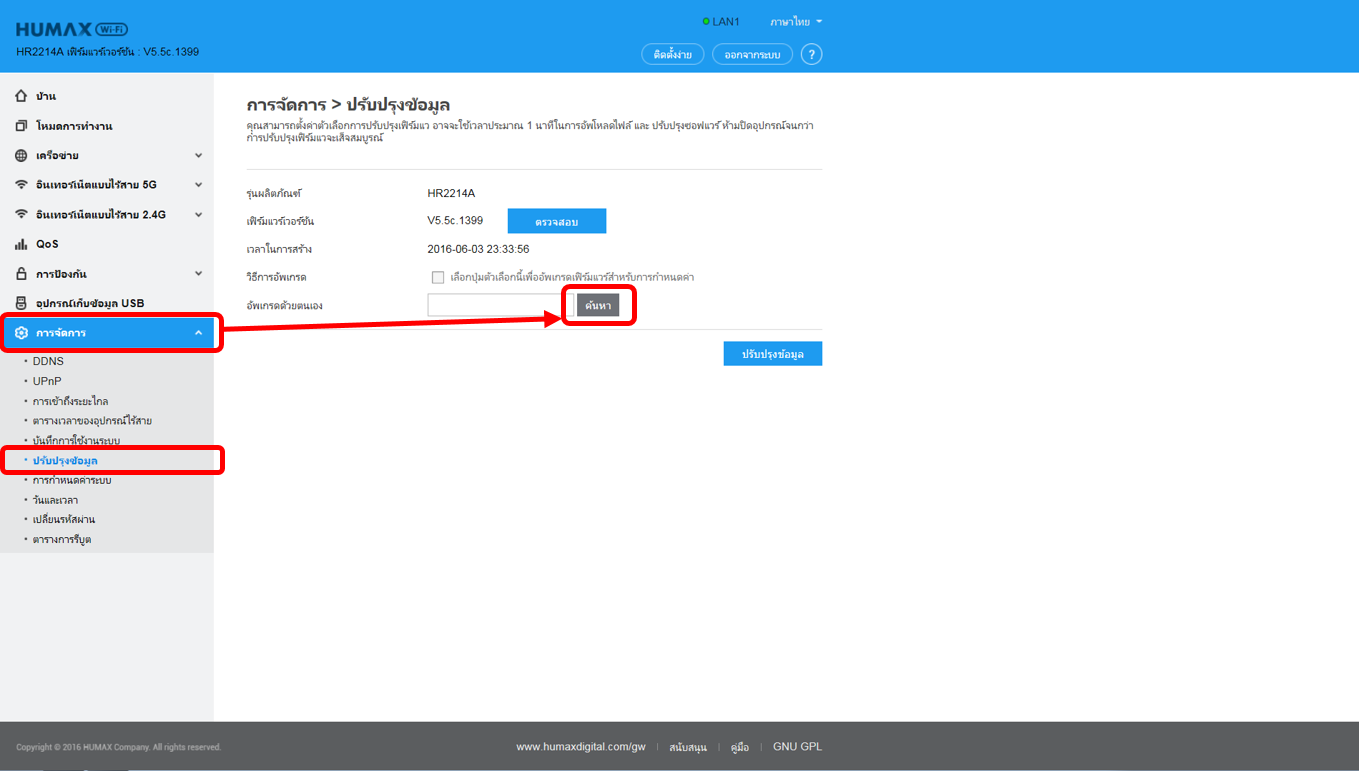
Step 4
Choose latest firmware for upgrade and click the open button.
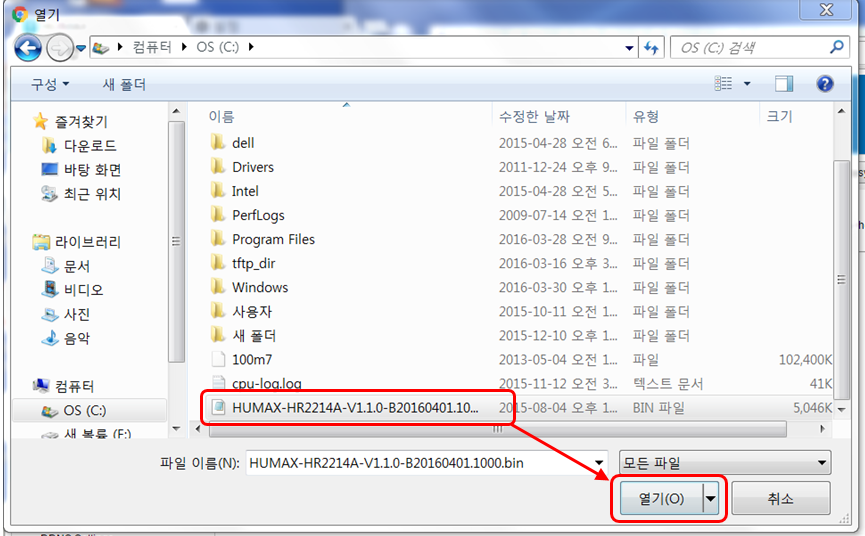
Step 5
After check the selected file, Click the Update button. After the router reboots, upgrade procedure finished.
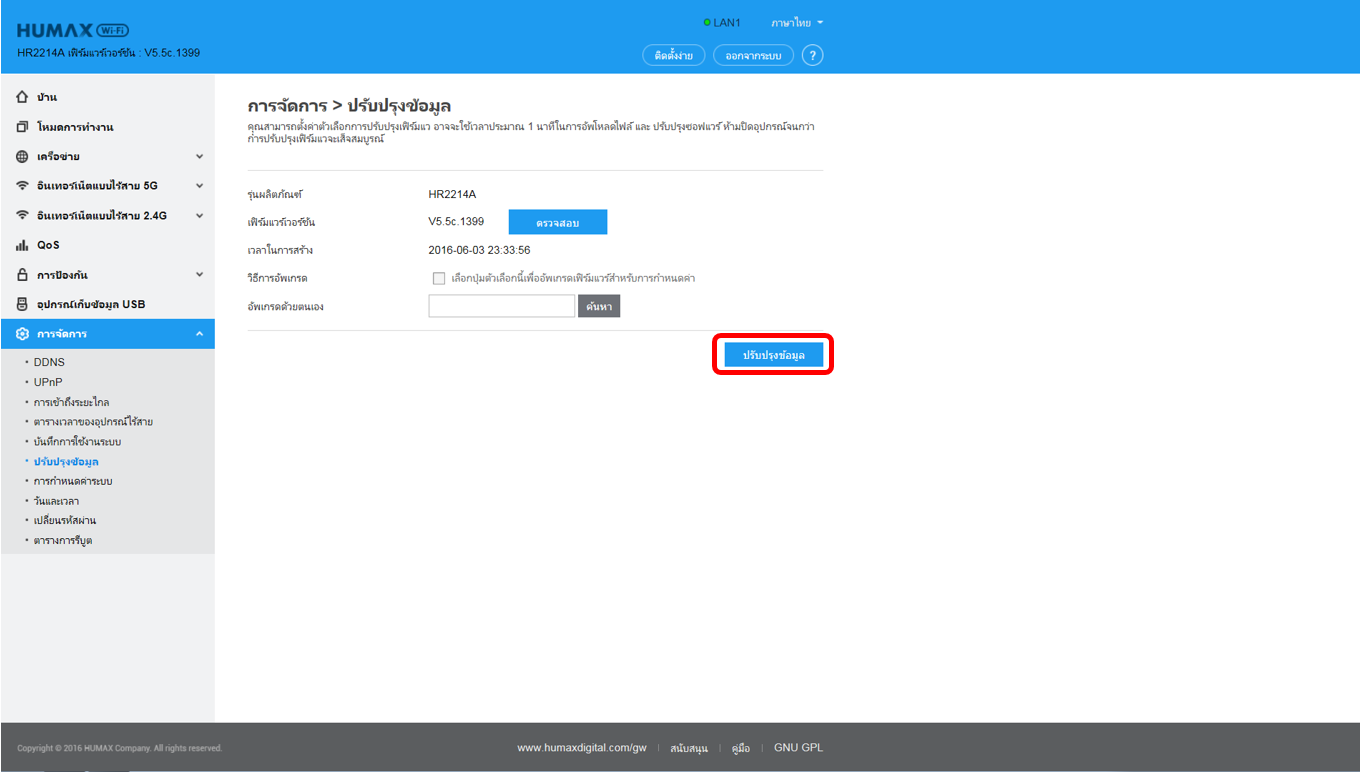
Note:
DO NOT power off the device or close the browser window during the upload because it may crash the system.
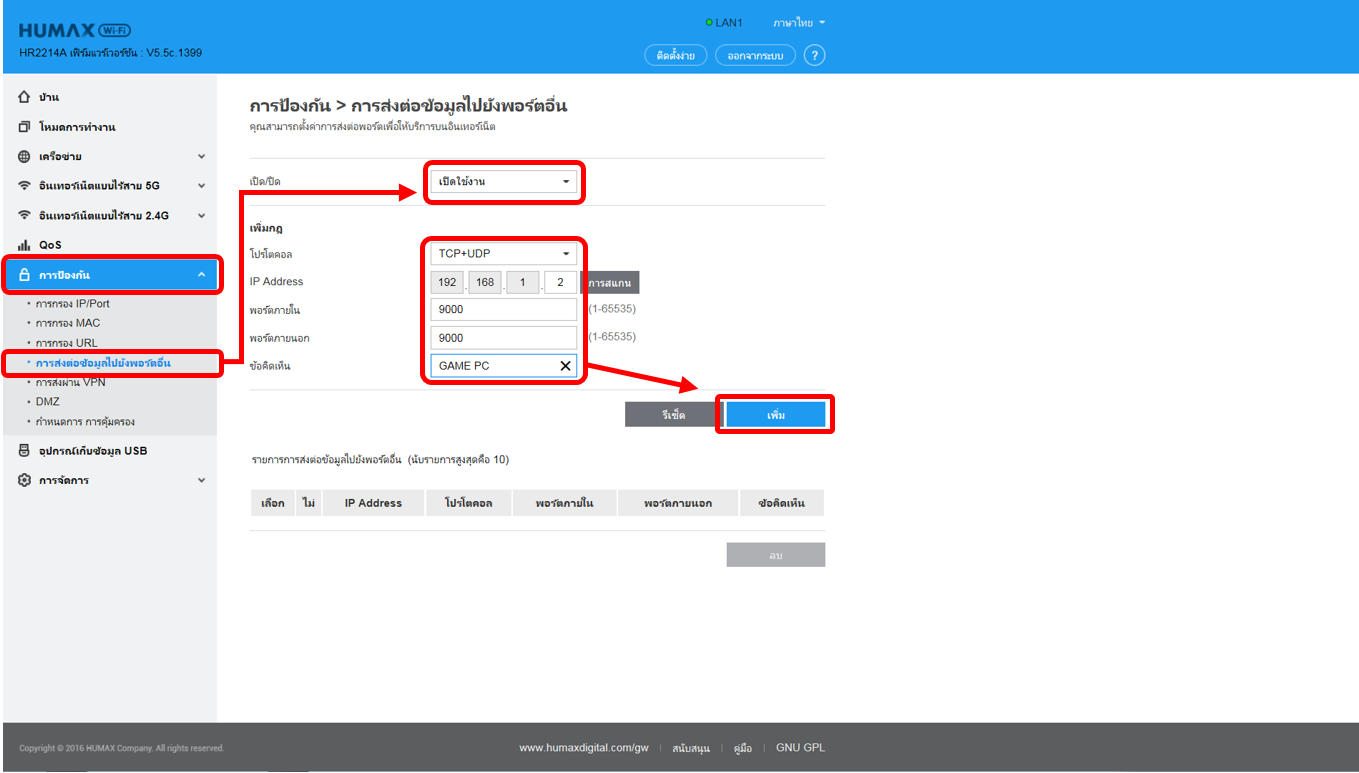
How to configure port forwarding on the router?
By port forwarding, the data for Internet applications can pass through the firewall of the router or gateway. This article will show you how to forward ports on your router.
Step 1
Log into the router’s web interface.
Step 2
Click Advanced Setup button of the Easy Setup page.
Step 3
1. Click Firewall -> Port Forwarding on the left side.
2. Change the Port Forwarding Disable/Enable to Enable.
3. Select Protocol Type.
4. Type the IP Address of your device that you want to open the port.
5. Type the Internal Port which you want to open.
6. The Remote IP Address you can put in the blank.
7. Click the Apply button.
Step 4
Check the current Port Forwarding Table you typed.
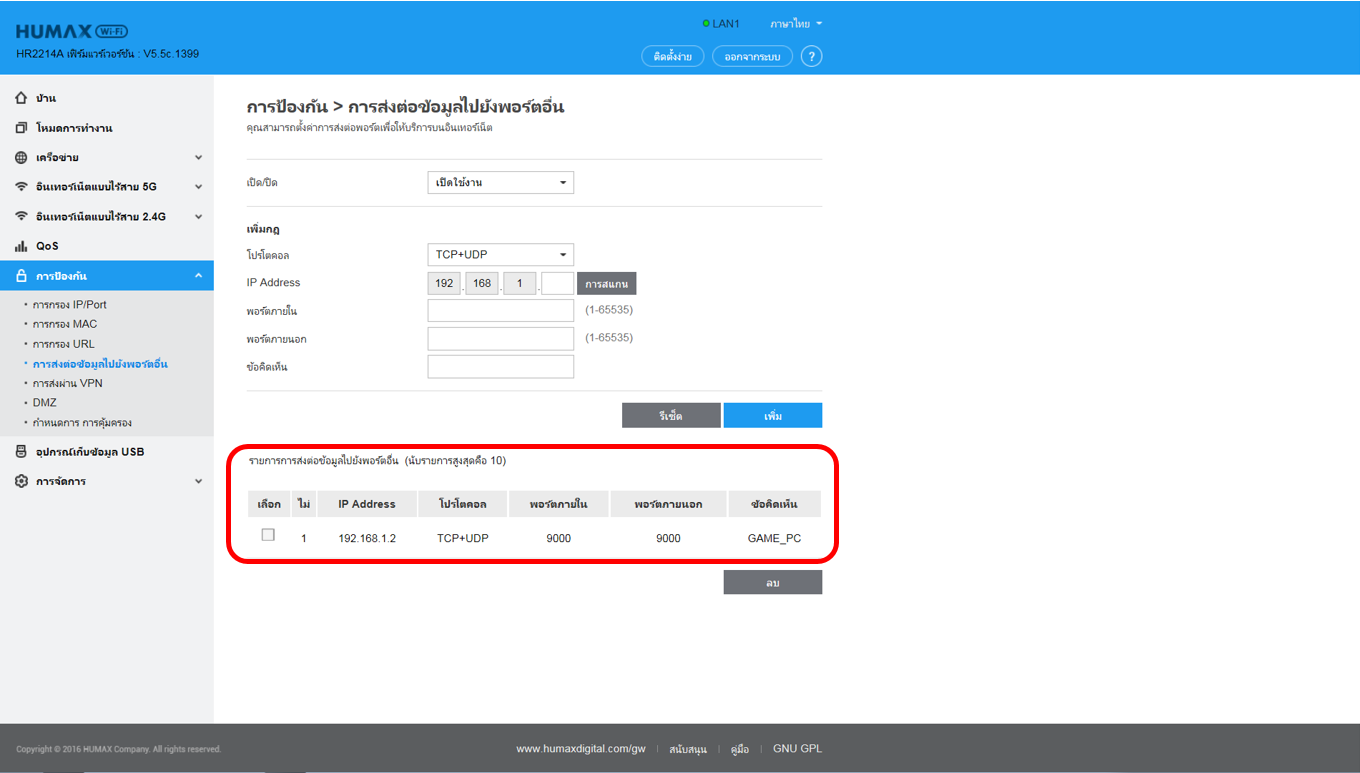
Note:
Since the Forwarding rules are related to IP Address of the device, it is suggested to set up a static IP for your device that needs to open the ports.
Step 1
Log into the router’s web interface.
Step 2
Click Advanced Setup button of the Easy Setup page.
Step 3
1. Click Firewall -> Port Forwarding on the left side.
2. Change the Port Forwarding Disable/Enable to Enable.
3. Select Protocol Type.
4. Type the IP Address of your device that you want to open the port.
5. Type the Internal Port which you want to open.
6. The Remote IP Address you can put in the blank.
7. Click the Apply button.

Step 4
Check the current Port Forwarding Table you typed.

Note:
Since the Forwarding rules are related to IP Address of the device, it is suggested to set up a static IP for your device that needs to open the ports.
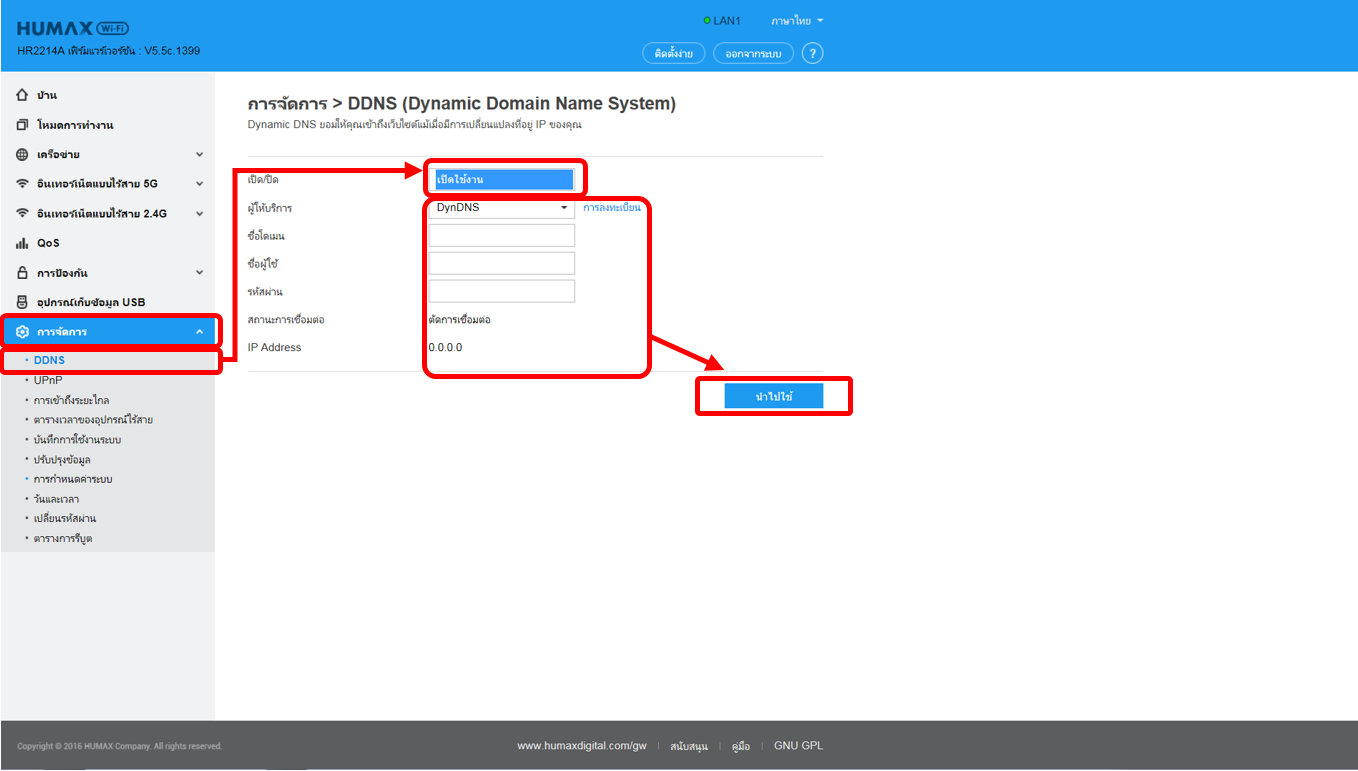
How to configure DDNS on the router?
DDNS (Dynamic Domain Name Server) is to achieve a fixed domain name to dynamic IP resolution. In this way, most users don’t need to use fixed IP and can also name the fixed network system.
Step 1
Log into the router’s web interface.
Step 2
Click Advanced Setup button of the Easy Setup page.
Step 3
1. Click Management -> DDNS Setting on the left side
2. Change the DDNS Disable/Enable to Enable.
3. Enter the DDNS Service Provider, Domain name, User Name/Email and password key in the blank space.
4. Click the Apply button.

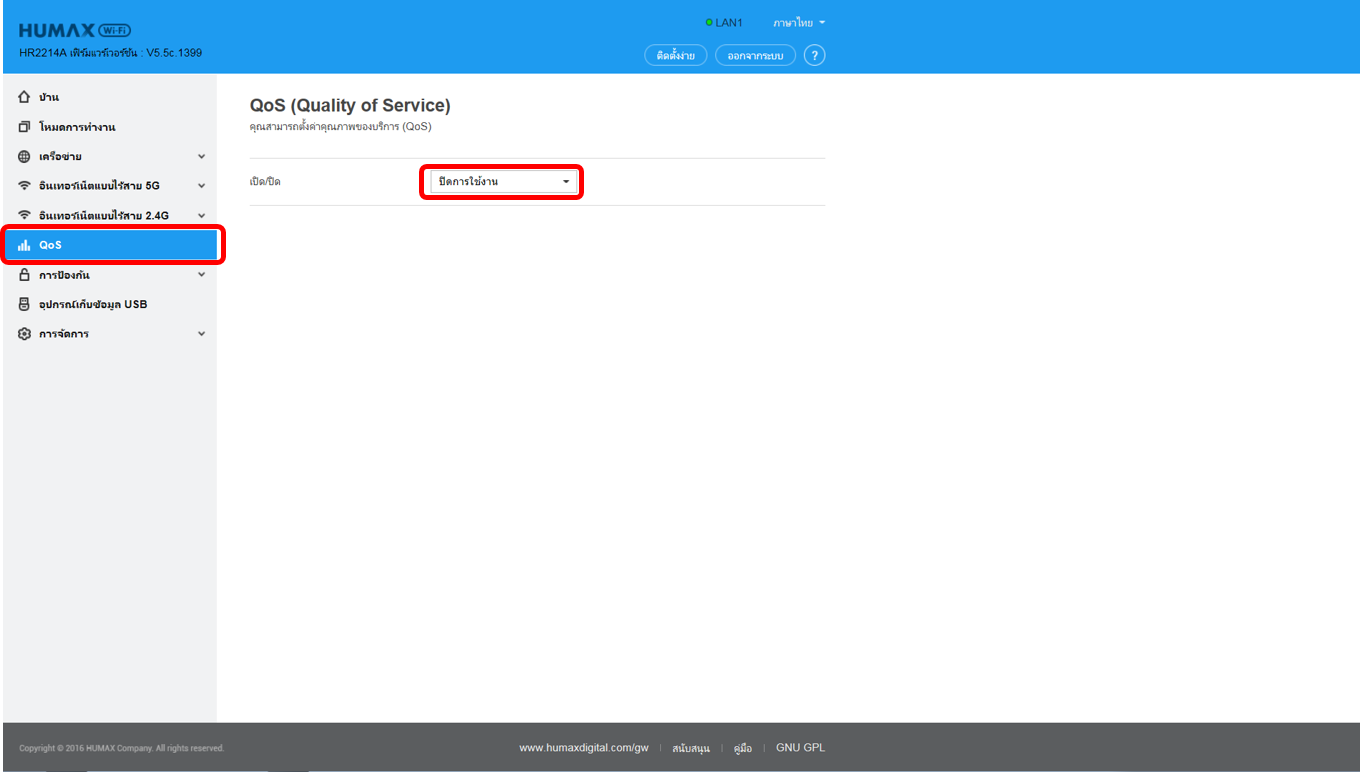
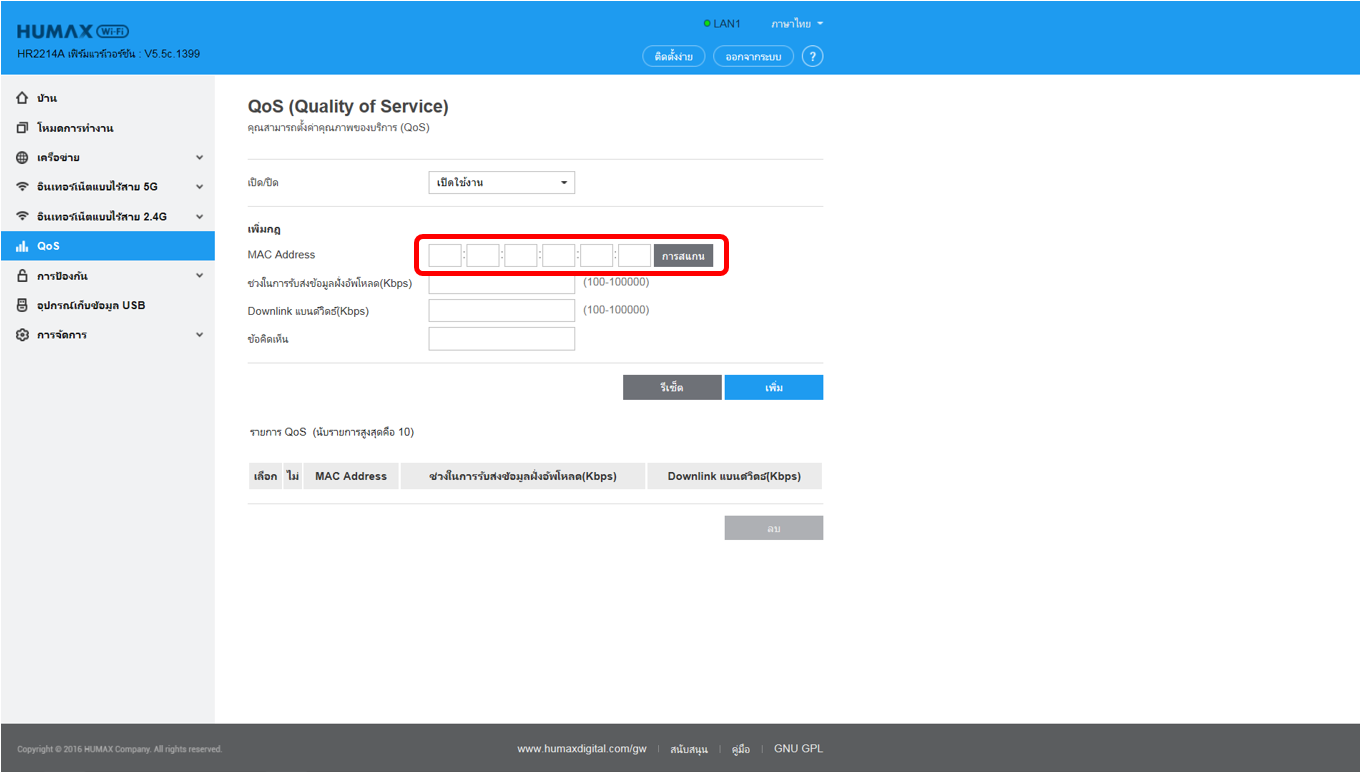
How to configure QoS on the router?
If you want to configure QoS, please follow step below.
Step 1
Log into the router’s web interface.
Step 2
Click Advanced Setup button of the Easy Setup page.
Step 3
Easy Setup page will turn up, then click Advanced Setup button.
Step 4
1. Click QoS on the left side.
2. Change the QoS On/Off to Enable.
Step 5
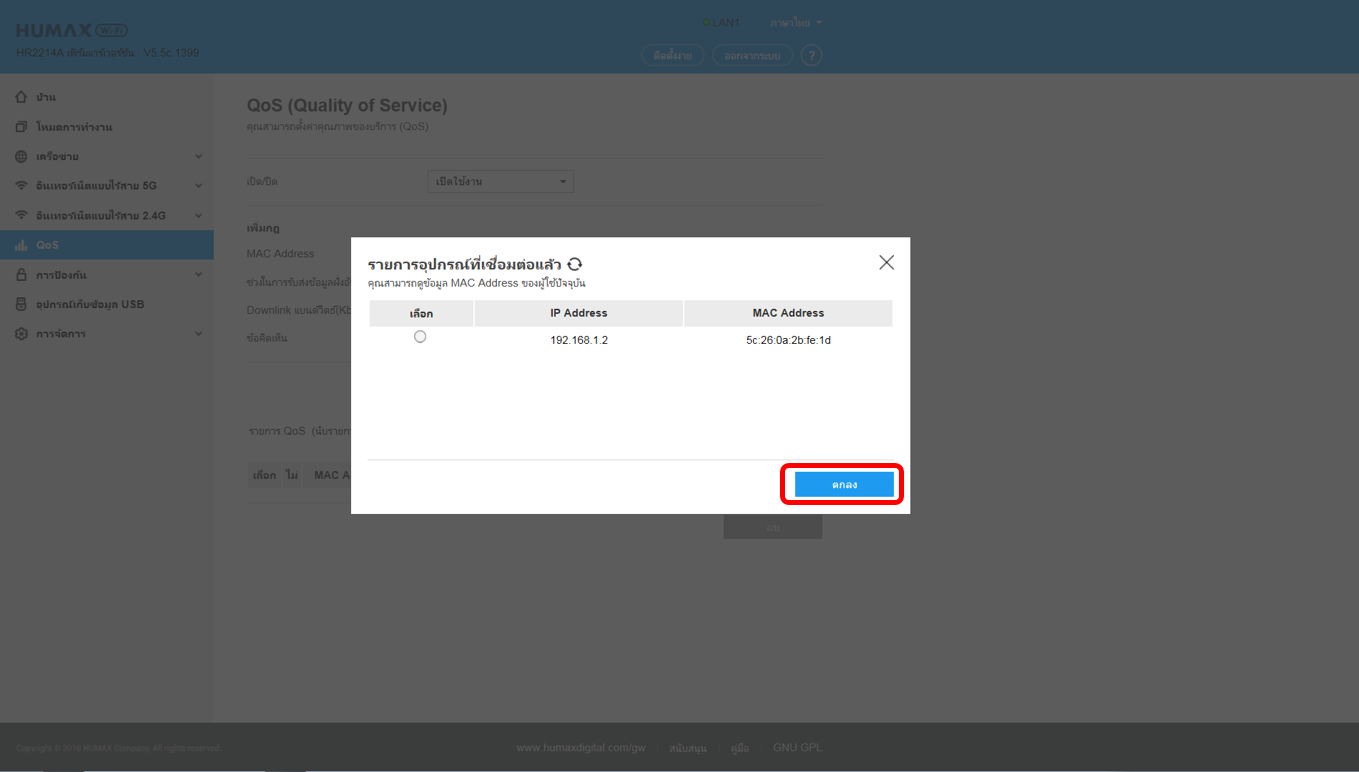
1. Click Scan to find IP address.
Step 6
After you select the desired IP, click the OK button.
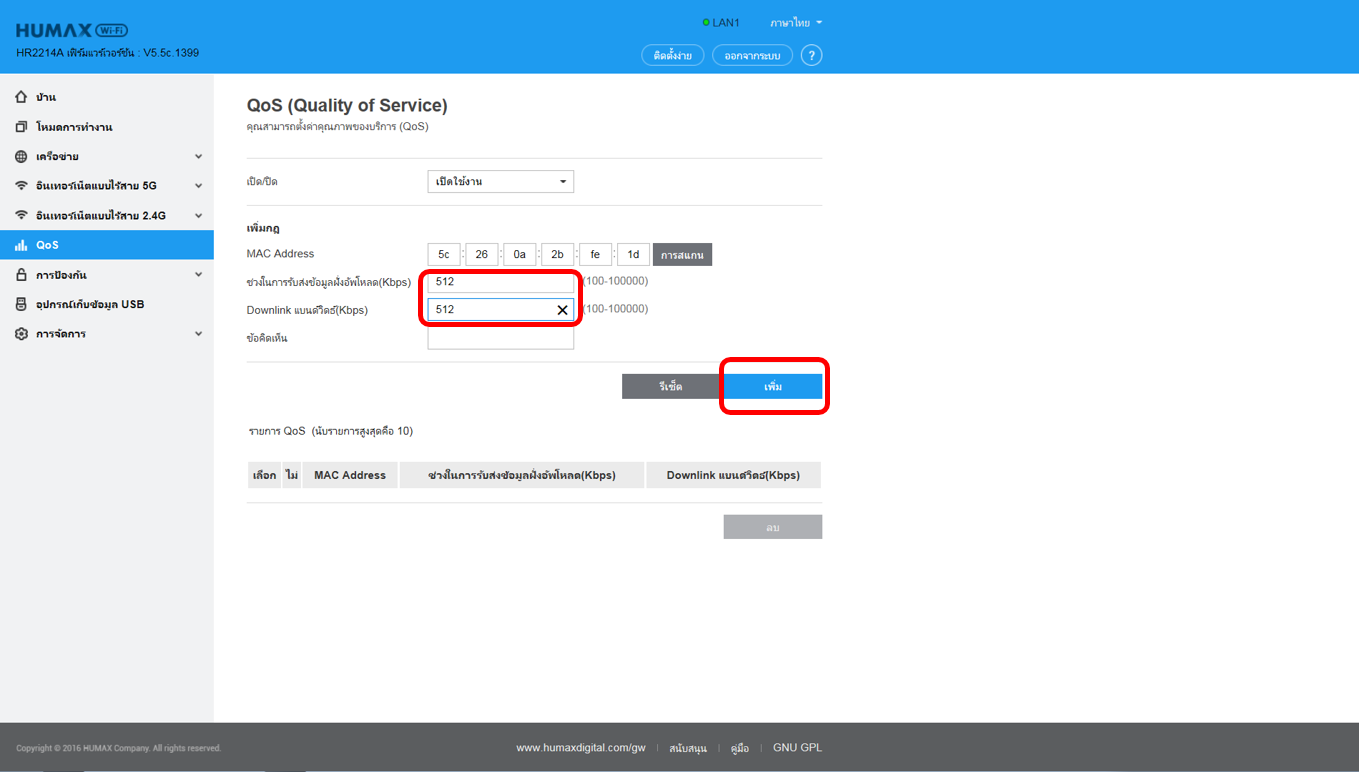
Step 7
Input Connection limit and Comment
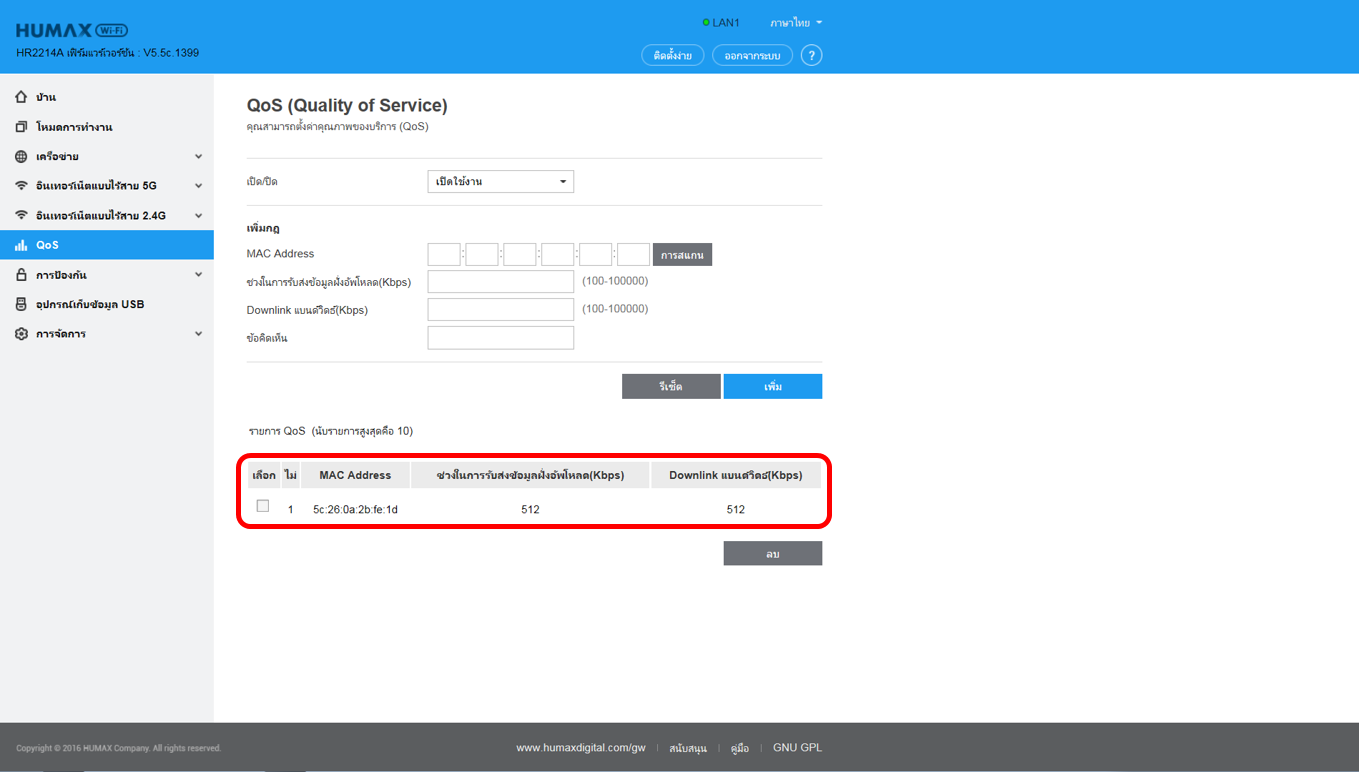
Step 8
You can check the status.
Step 1
Log into the router’s web interface.
Step 2
Click Advanced Setup button of the Easy Setup page.
Step 3
Easy Setup page will turn up, then click Advanced Setup button.
Step 4
1. Click QoS on the left side.
2. Change the QoS On/Off to Enable.

Step 5
1. Click Scan to find IP address.

Step 6
After you select the desired IP, click the OK button.

Step 7
Input Connection limit and Comment

Step 8
You can check the status.

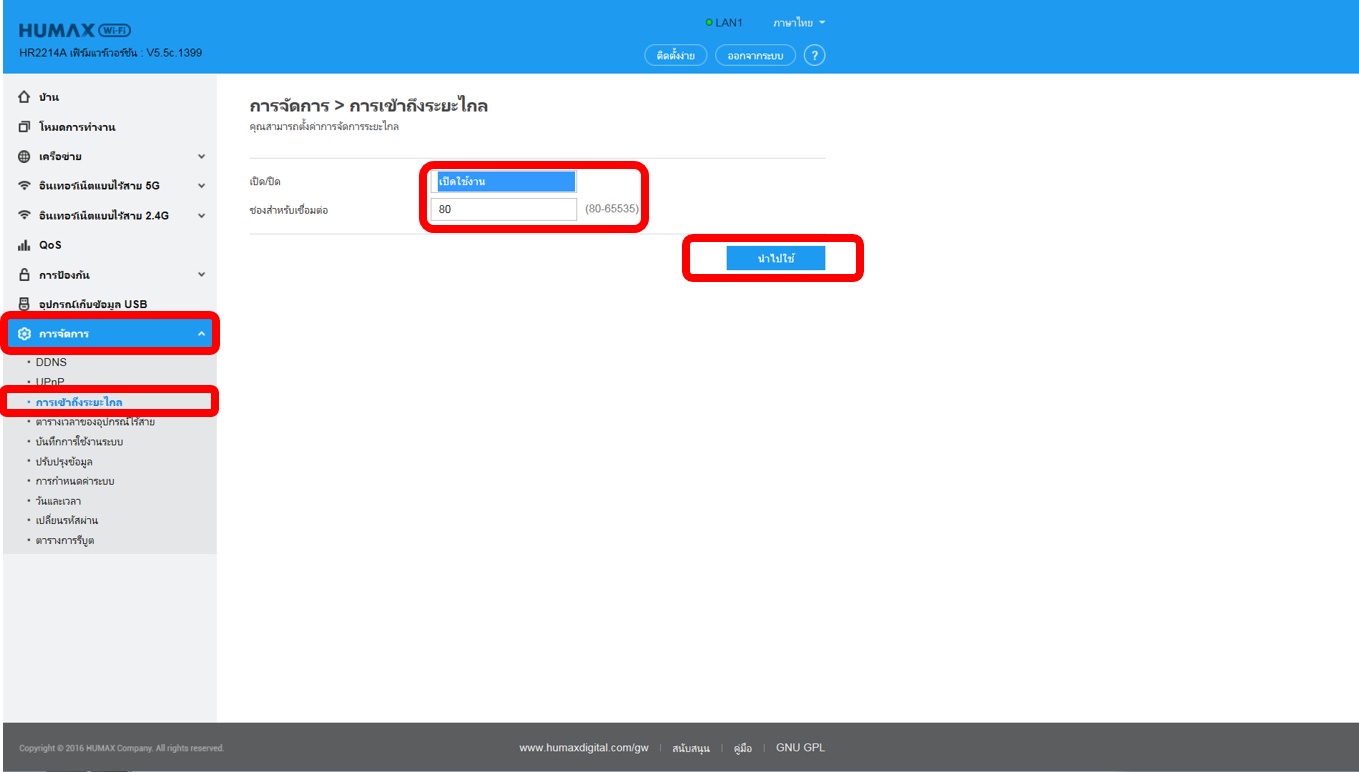
How to configure remote access?
The Remote Management feature allows you to manage the gateway from a remote location, via the Internet. This article will show you how to configure remote management on your router.
Step 1
Log into the router’s web interface.
Step 2
Click Advanced Setup button of the Easy Setup page.
Step 3
1. Click Management and Remote Access on the left side.
2. Change On/Off to Enable.
3. Type Port ( Default is 80 )
4. Click Apply.
Step 1
Log into the router’s web interface.
Step 2
Click Advanced Setup button of the Easy Setup page.
Step 3
1. Click Management and Remote Access on the left side.
2. Change On/Off to Enable.
3. Type Port ( Default is 80 )
4. Click Apply.

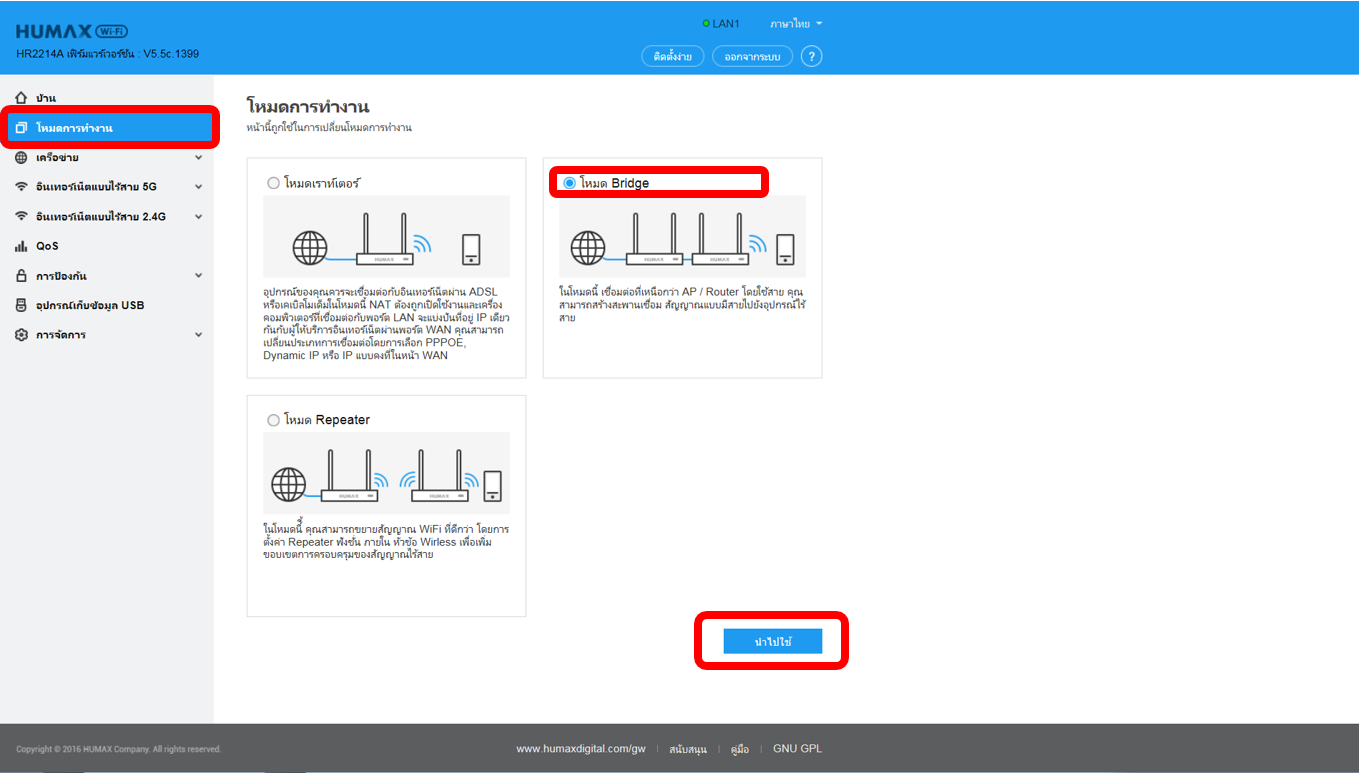
How to select Operation Mode?
HUMAX routers have multiple operation modes, such as Router Mode, Bride Mode and Repeater Mode. Here are tips to configure each mode. The default is Router Mode.
[ Bridge Mode ]
Step 1
Log into the router’s web interface.
Step 2
Click Advanced Setup button of the Easy Setup page.
Step 3
1. Click Operation mode
2. Select Bridge Mode
3. Click Apply
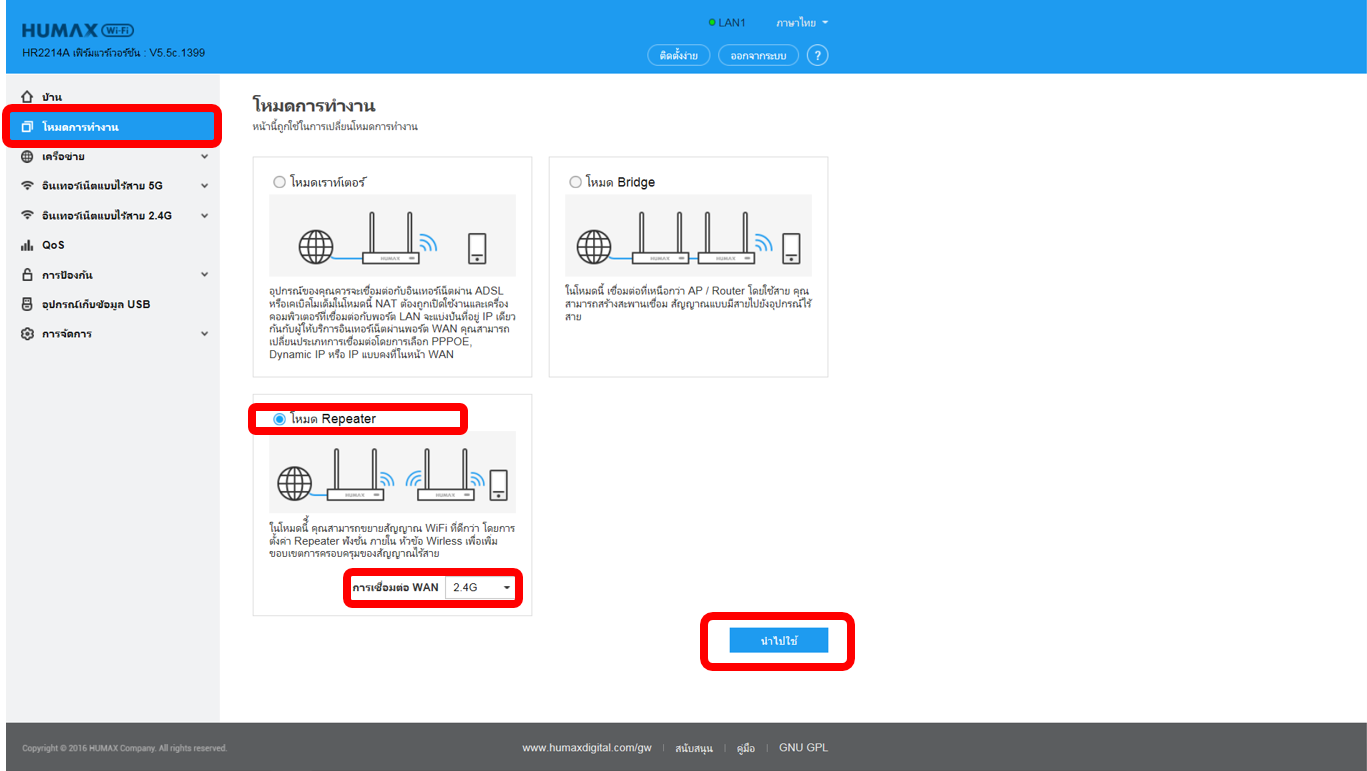
[ Repeater Mode ]
Step 1~2
The same as above.
Step 3
1. Click Repeater Mode
2. Select 2.4G or 5G
3. Click Apply
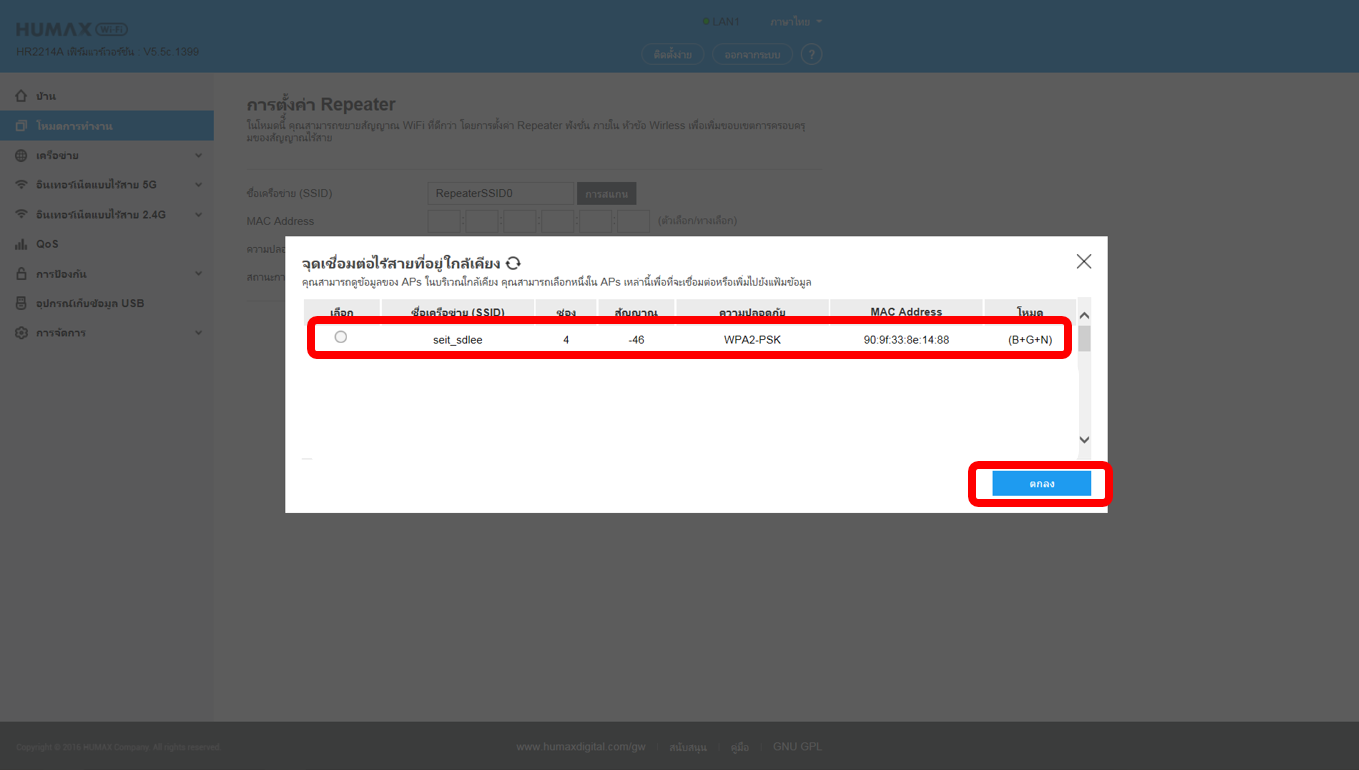
Step 4
Click Scan to search Network to access.
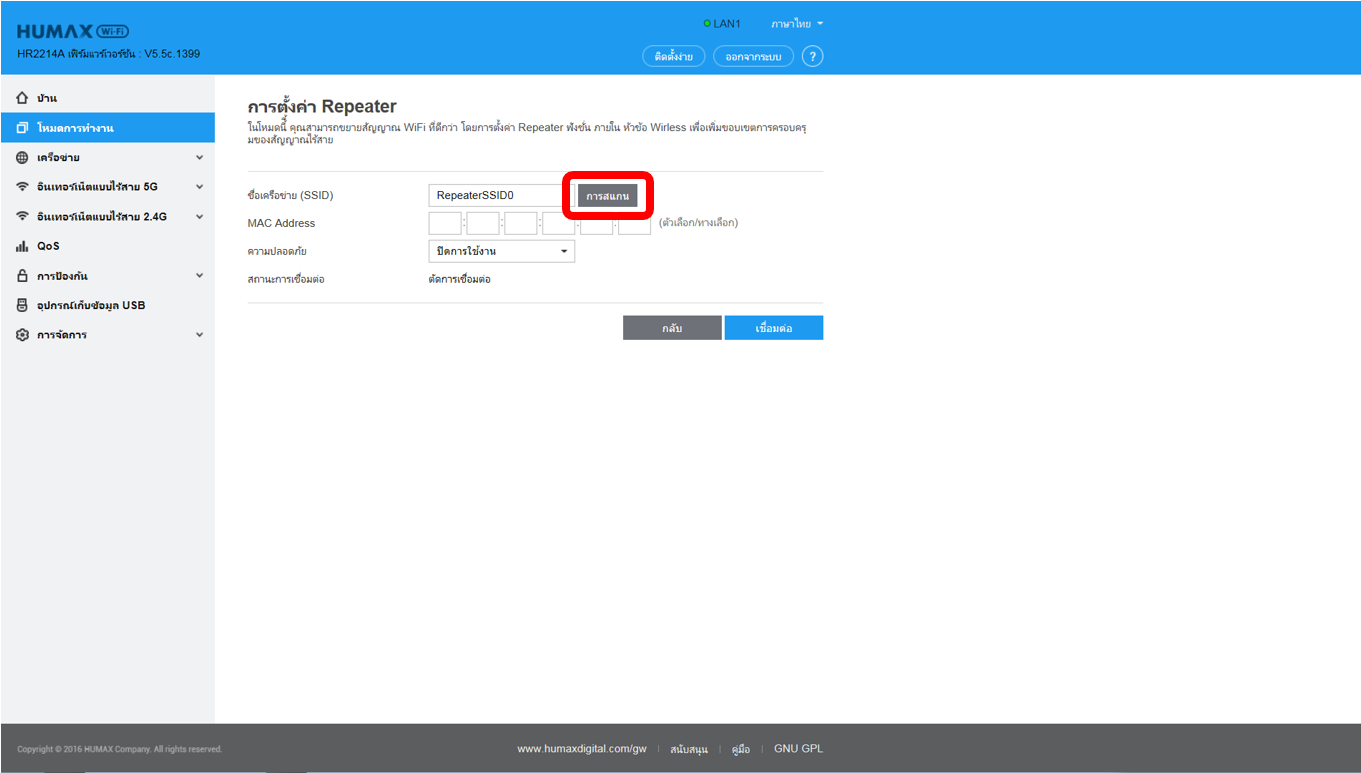
Step 5
Select one of the Network and click OK.
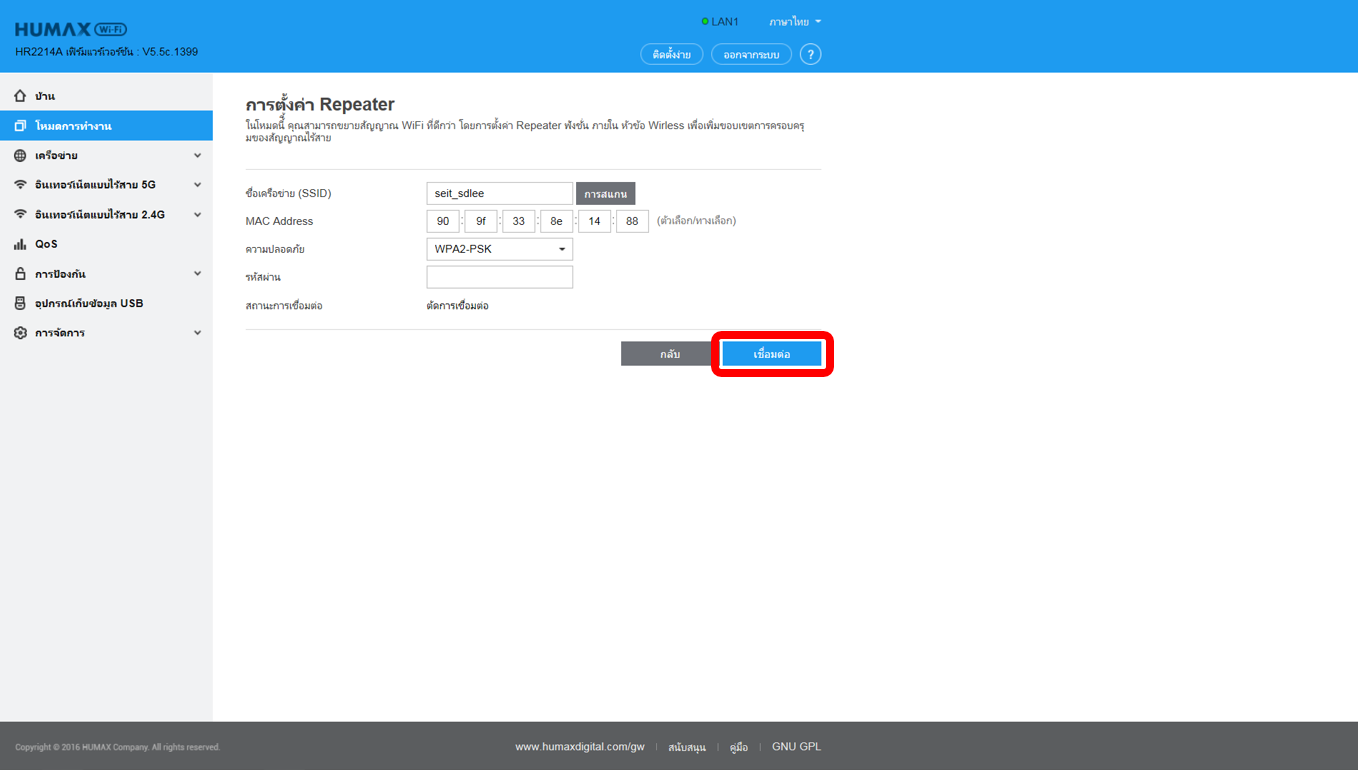
Step 6
Click Connect.

How to configure multiple AP’s
Multiple APs function allows users to create network name for clients or friends accordingly.
Step 1
Log into the router’s web interface.
Step 2
Click Advanced Setup button of the Easy Setup page.
Step 3
1. Click Wireless 5GHz and Guest Network on the left side.
2. Type Network Name.
3. Change Security to WPA/WPA2-PSK and select Hide SSID if you want.
4. Type password and click Add.
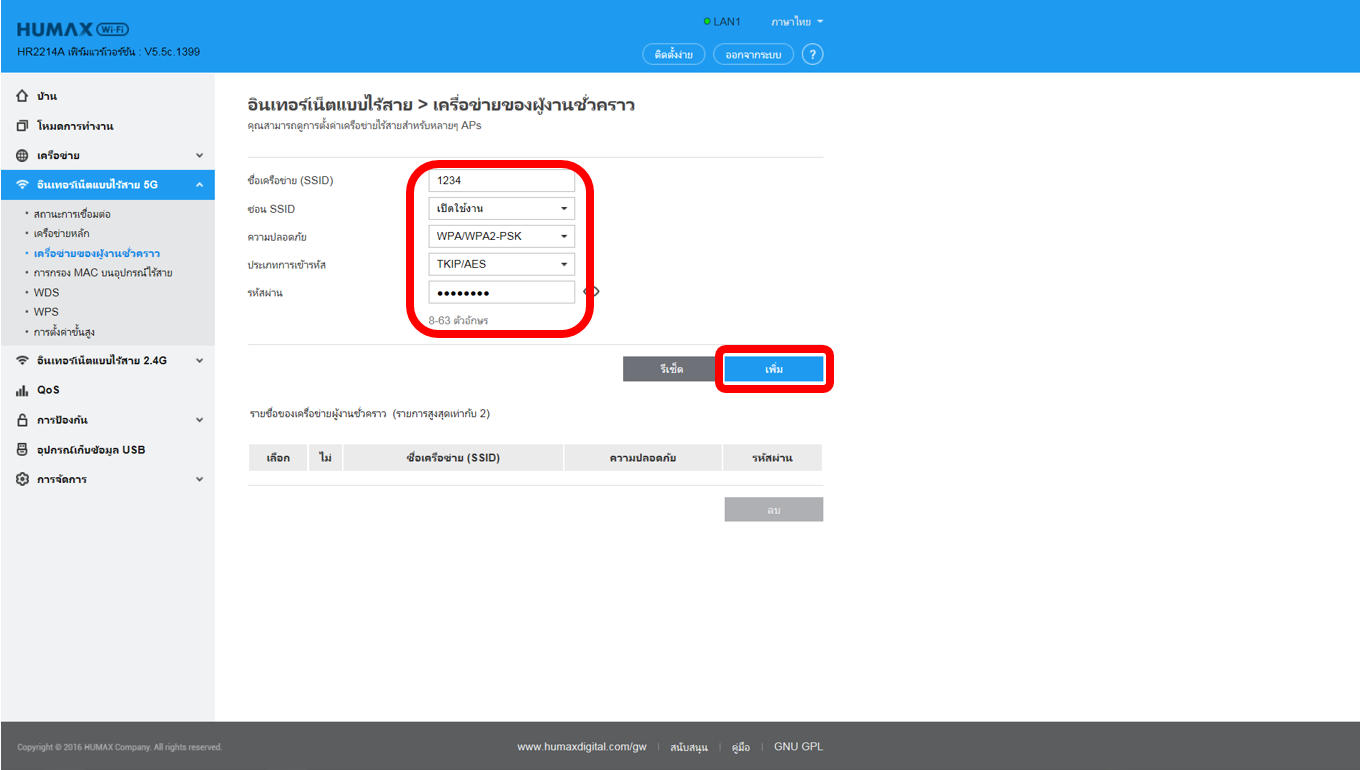
Step 4
You can find out the list and add the network up to 2.

How to configure FTP Service?
File server can be built quickly and easily via the USB port applications so that file upload and download can be more flexible. This guide introduces how to configure FTP service via the router.
Please make sure that USB flash disk or hard drives are plugged it into the USB port of the router before the steps.
Step 1
Log into the router’s web interface.
Step 2
Click Advanced Setup button of the Easy Setup page.
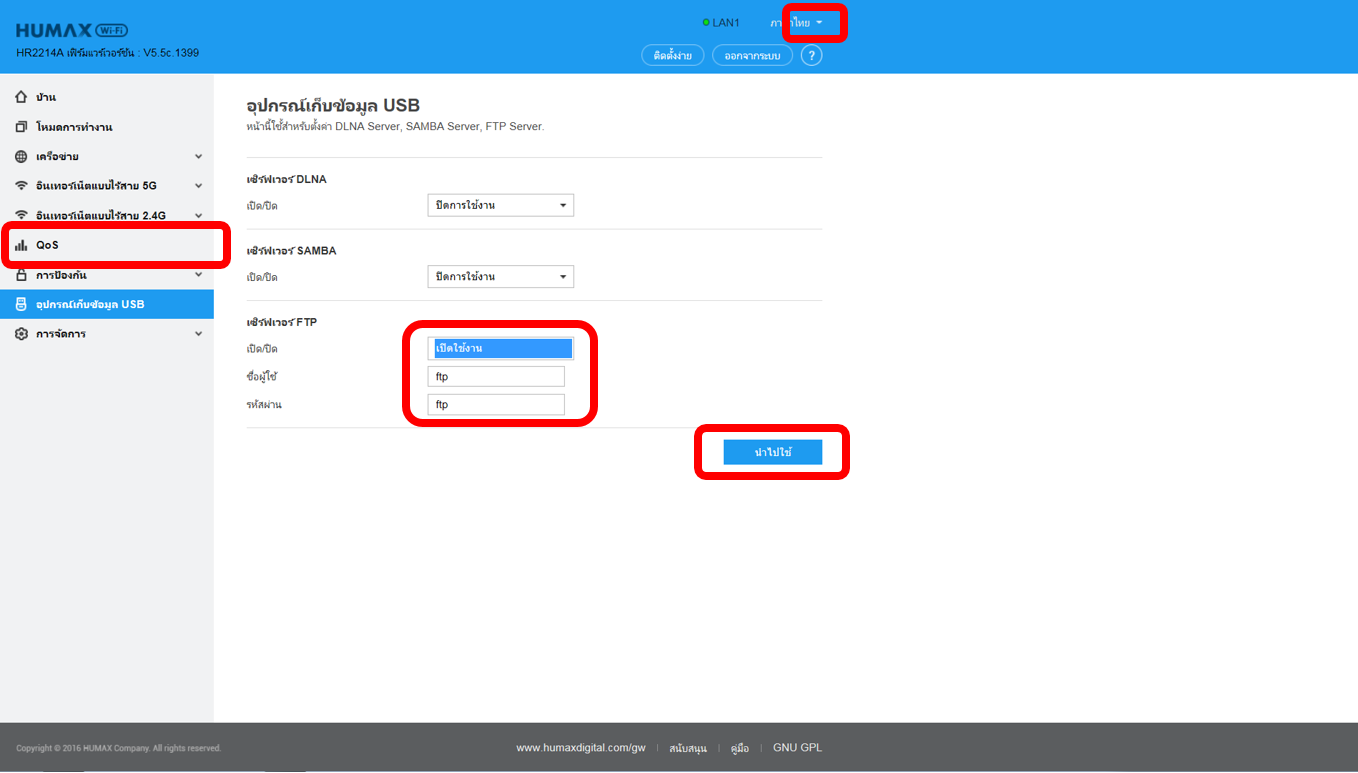
Step 3
1. Check if USB light is turned on the top right side.
2. Click USB Storage.
3. Change On/Off to Enable on FTP Sever menu.
4. Type User Name and Password.
5. Click Apply.
Step 4
Type ftp://192.168.1.1 in the address bar of My Computer or the web browser.

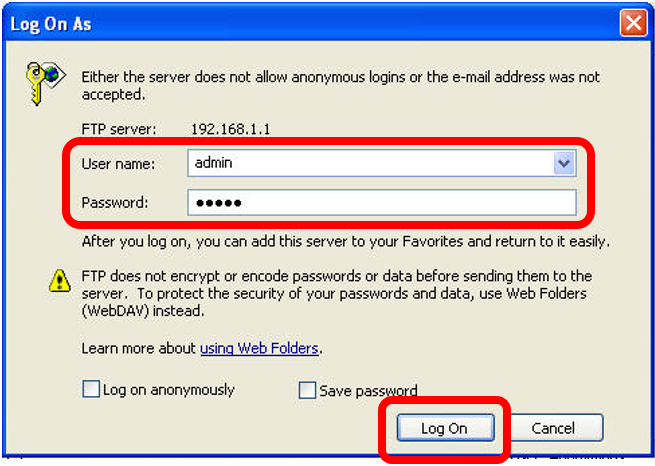
Step 5
Type User name and Password that you have set before and click Log On.
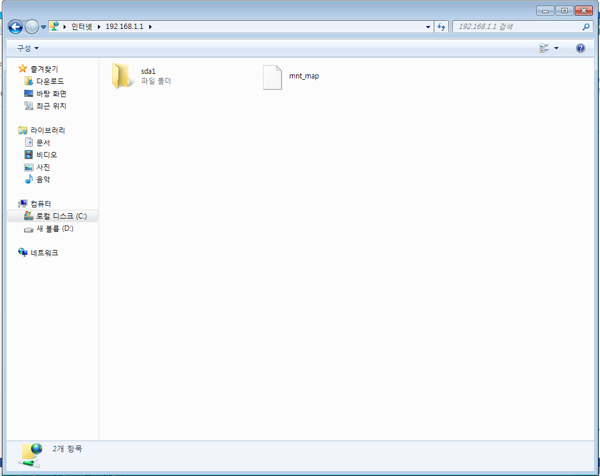
Step 6
You can access data on the USB stick or storage disk.
Please make sure that USB flash disk or hard drives are plugged it into the USB port of the router before the steps.
Step 1
Log into the router’s web interface.
Step 2
Click Advanced Setup button of the Easy Setup page.
Step 3
1. Check if USB light is turned on the top right side.
2. Click USB Storage.
3. Change On/Off to Enable on FTP Sever menu.
4. Type User Name and Password.
5. Click Apply.

Step 4
Type ftp://192.168.1.1 in the address bar of My Computer or the web browser.

Step 5
Type User name and Password that you have set before and click Log On.

Step 6
You can access data on the USB stick or storage disk.

How to do reset?
If you have changed the login password and you forgot the password, you need to reset it to factory default.
Step 1.
When the device is running, press the reset button on the rear panel for 10 seconds or more.

Step 2.
Release the reset button and wait for the device to reboot.
Note:
After reset to factory default, the default login username is “admin” and password is the 4 serial number at the bottom of your product “nnnn”.